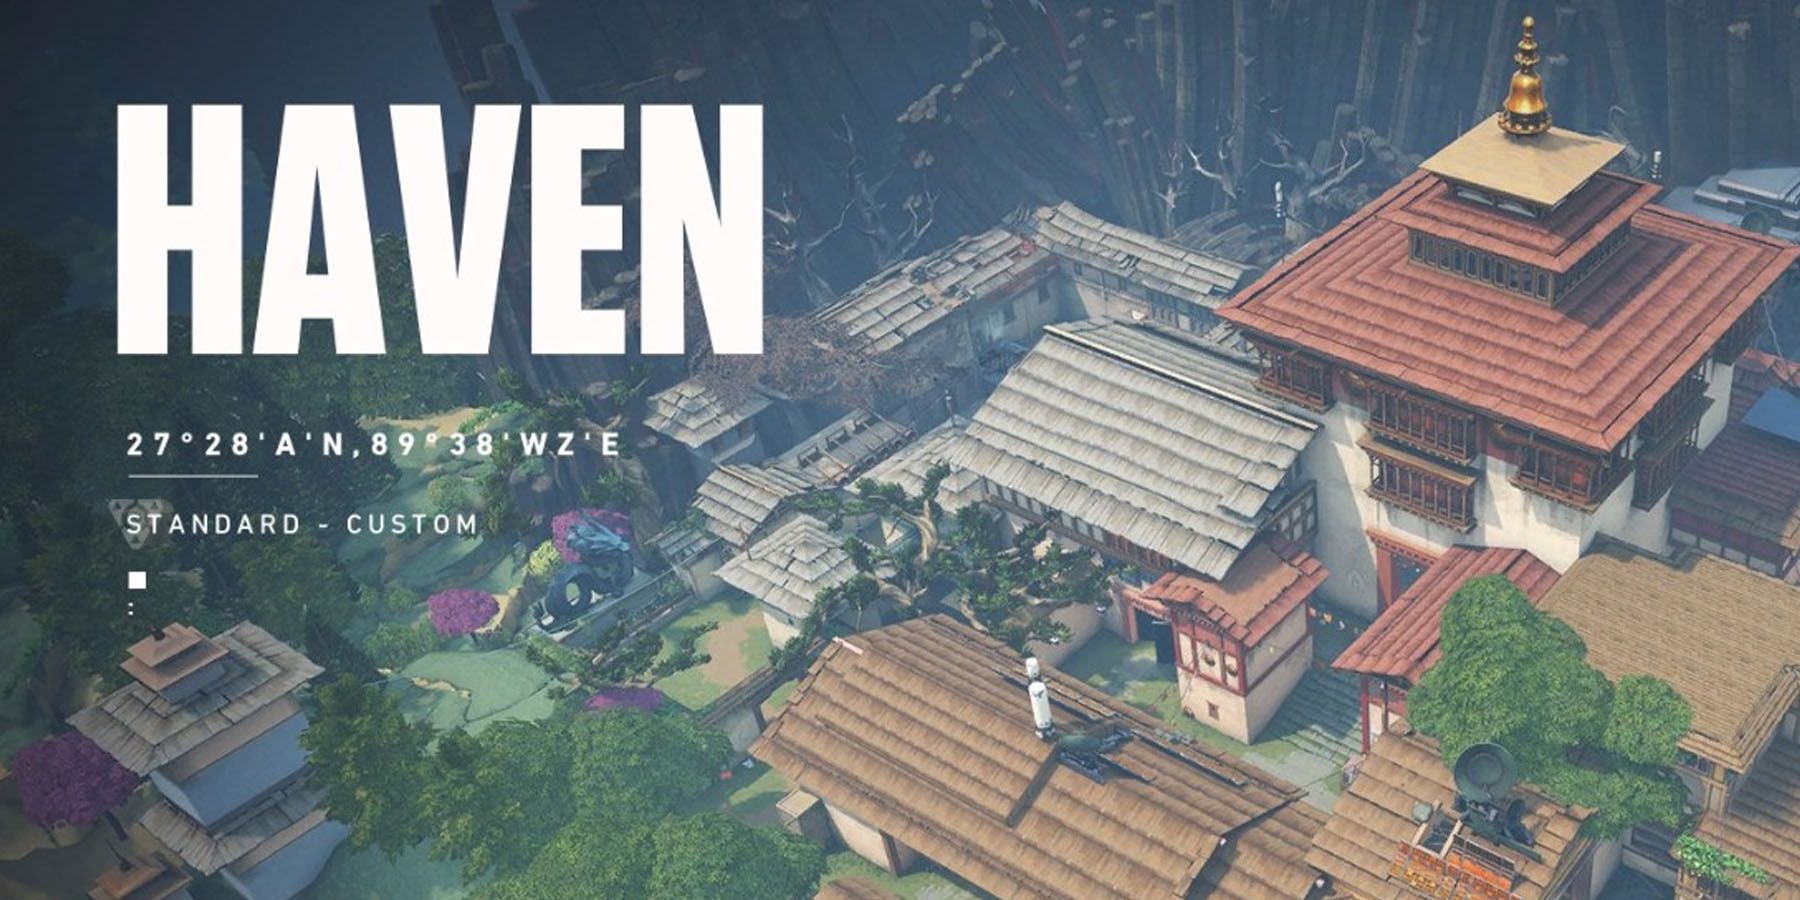
With Harbor about to burst his way into Valorant with his water manipulation abilities, fans of the FPS may immediately want to see if his toolkit fits some of the game’s most popular maps, such as Haven. Among the maps in the game, it’s the Haven Map that boasts some of the more intense firefights in the acclaimed FPS title. It’s not necessarily because Haven Map has some hijinks and unfair chokepoints. But rather, the Haven Map is one of the more fairly-built maps in the game. Boasting the appearance of a walled Japanese fortress, the Haven Map contains three planting sites and various intersections where teams can meet and have their own contests of power.
Interestingly, there’s more to Haven than meets the eye regarding the meta surrounding its appearance. Anyone with enough map sense to understand the intricacies of Haven can stand out and dominate matches. However, just how could Valorant players make the most out of this map?
The Haven: Enter The Third Site
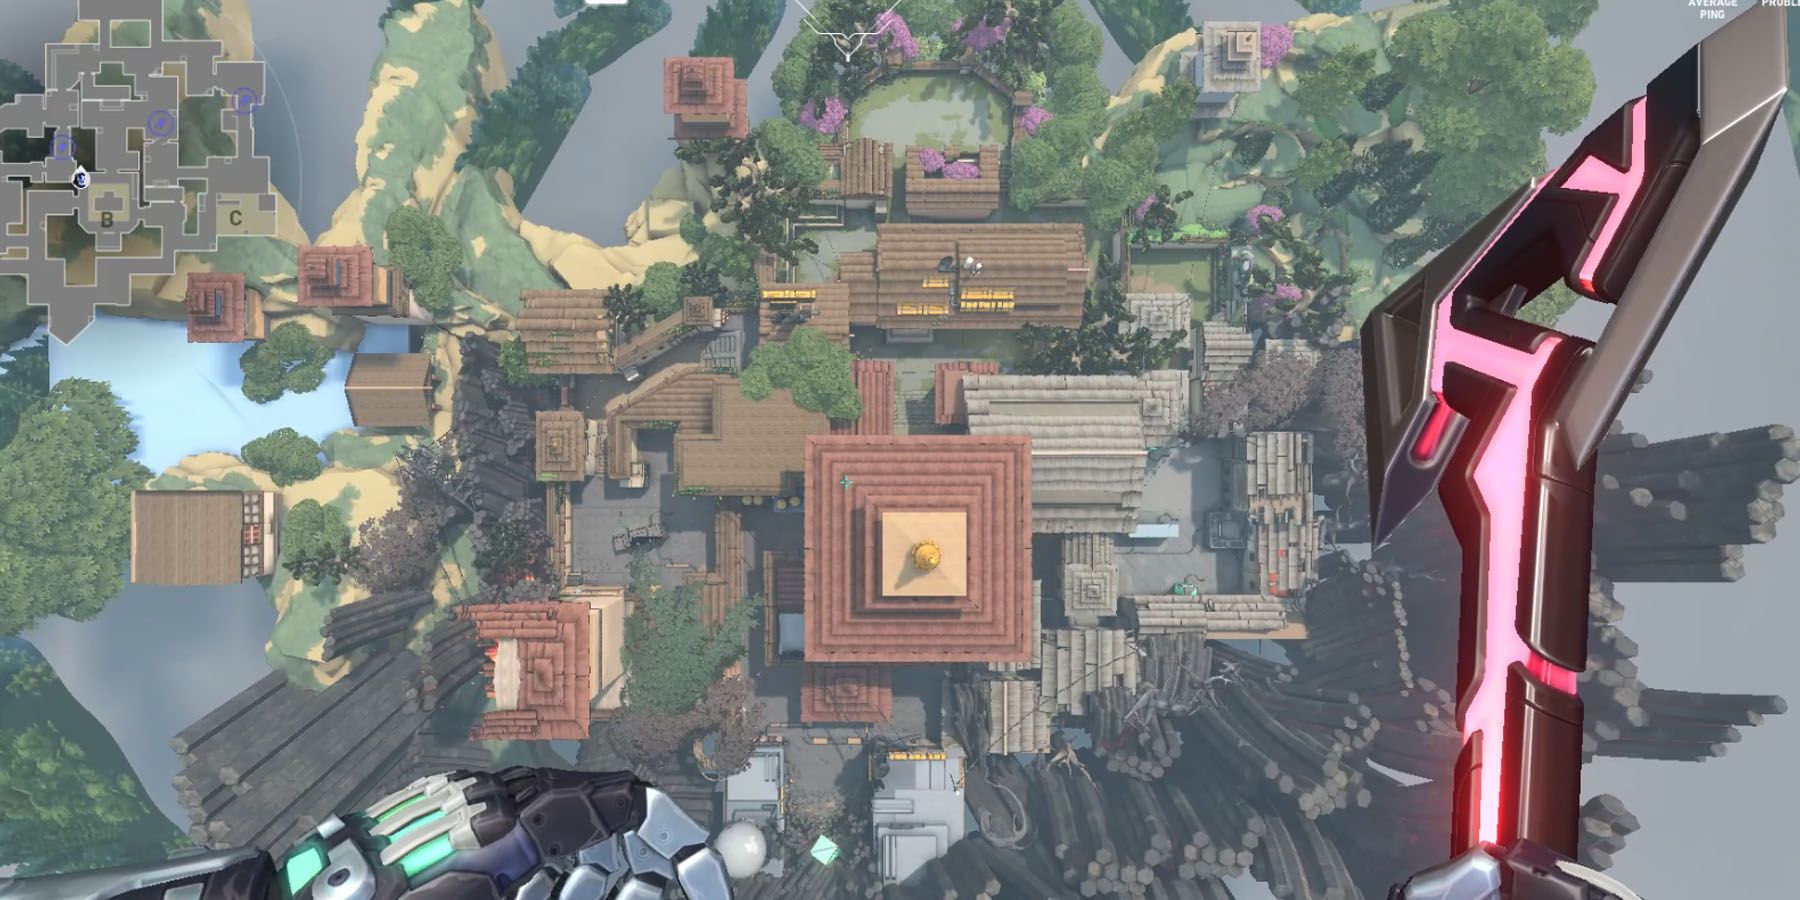
The Haven Map is one of the launch maps included in the game's initial release. Located in Thimphu, Bhutan, Haven is notable for its usage of Eastern architecture, particularly the unique roofing of houses predominantly in South-Central Asia. Its main areas are enclosed by trees on the southern half of the map, and tall mountains around the northern half.
Key Notes: A Third Variable
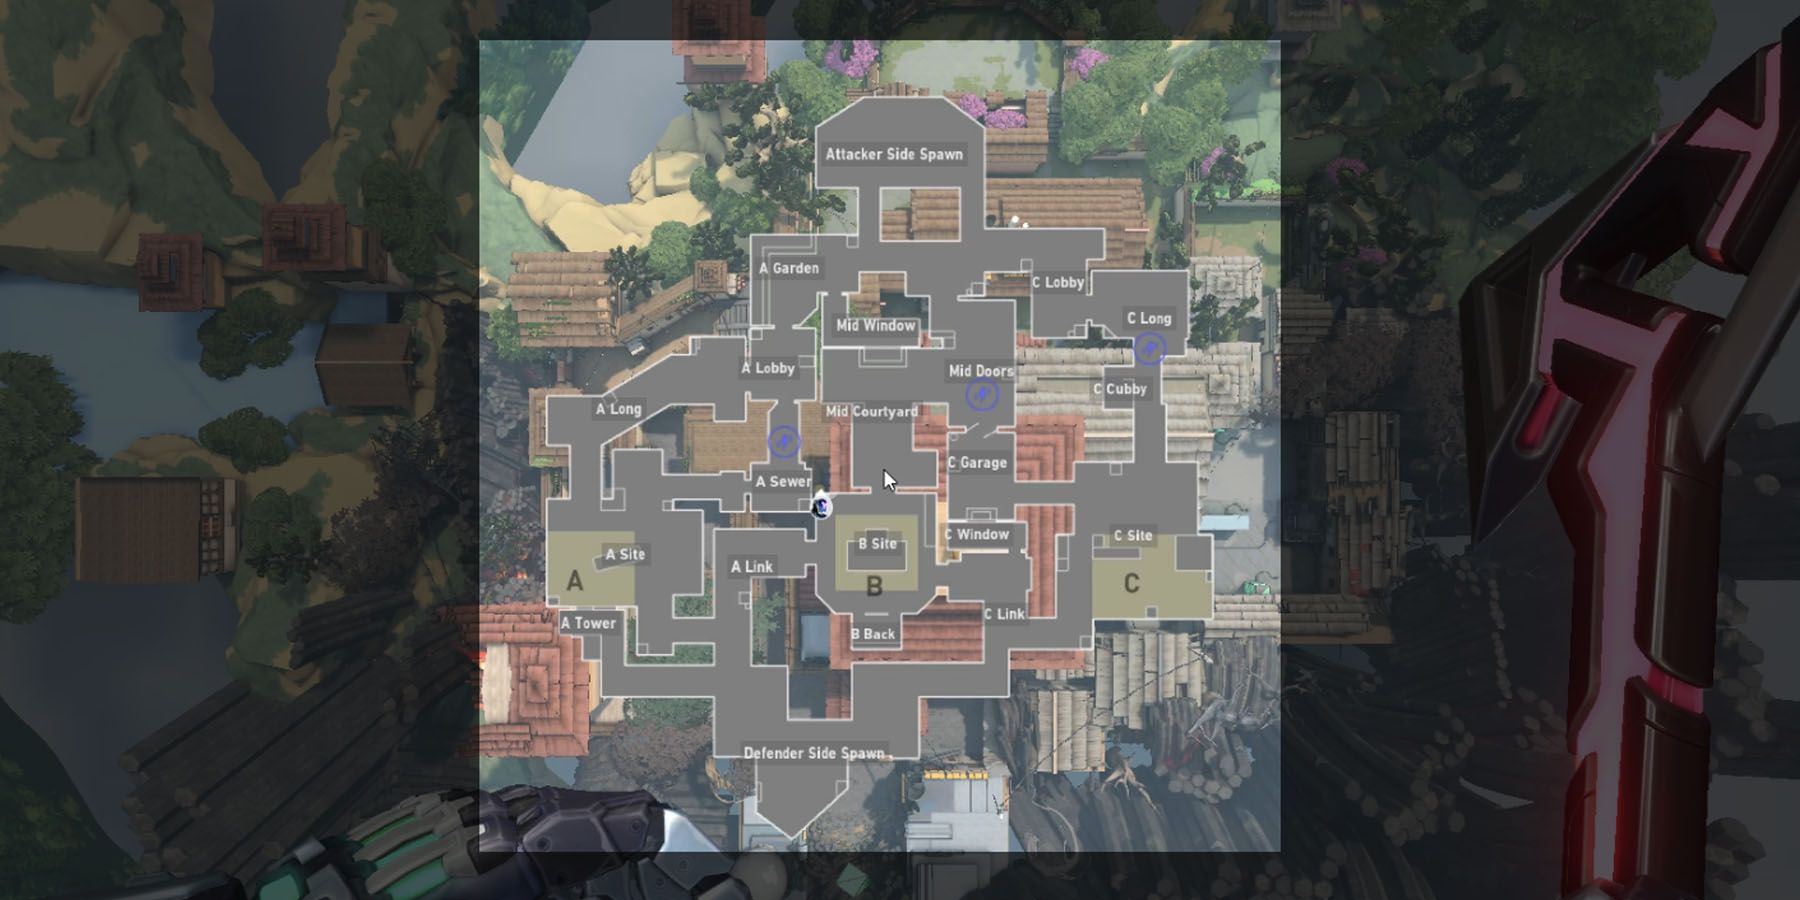
While the Haven Map is "ordinary" for all intents and purposes, its main shtick includes a third site, the C-Site. This adds a third variable on the Valorant map regarding exploration, especially since all three areas are easily accessible through the Mid-Sections. Here are other notable elements on the map:
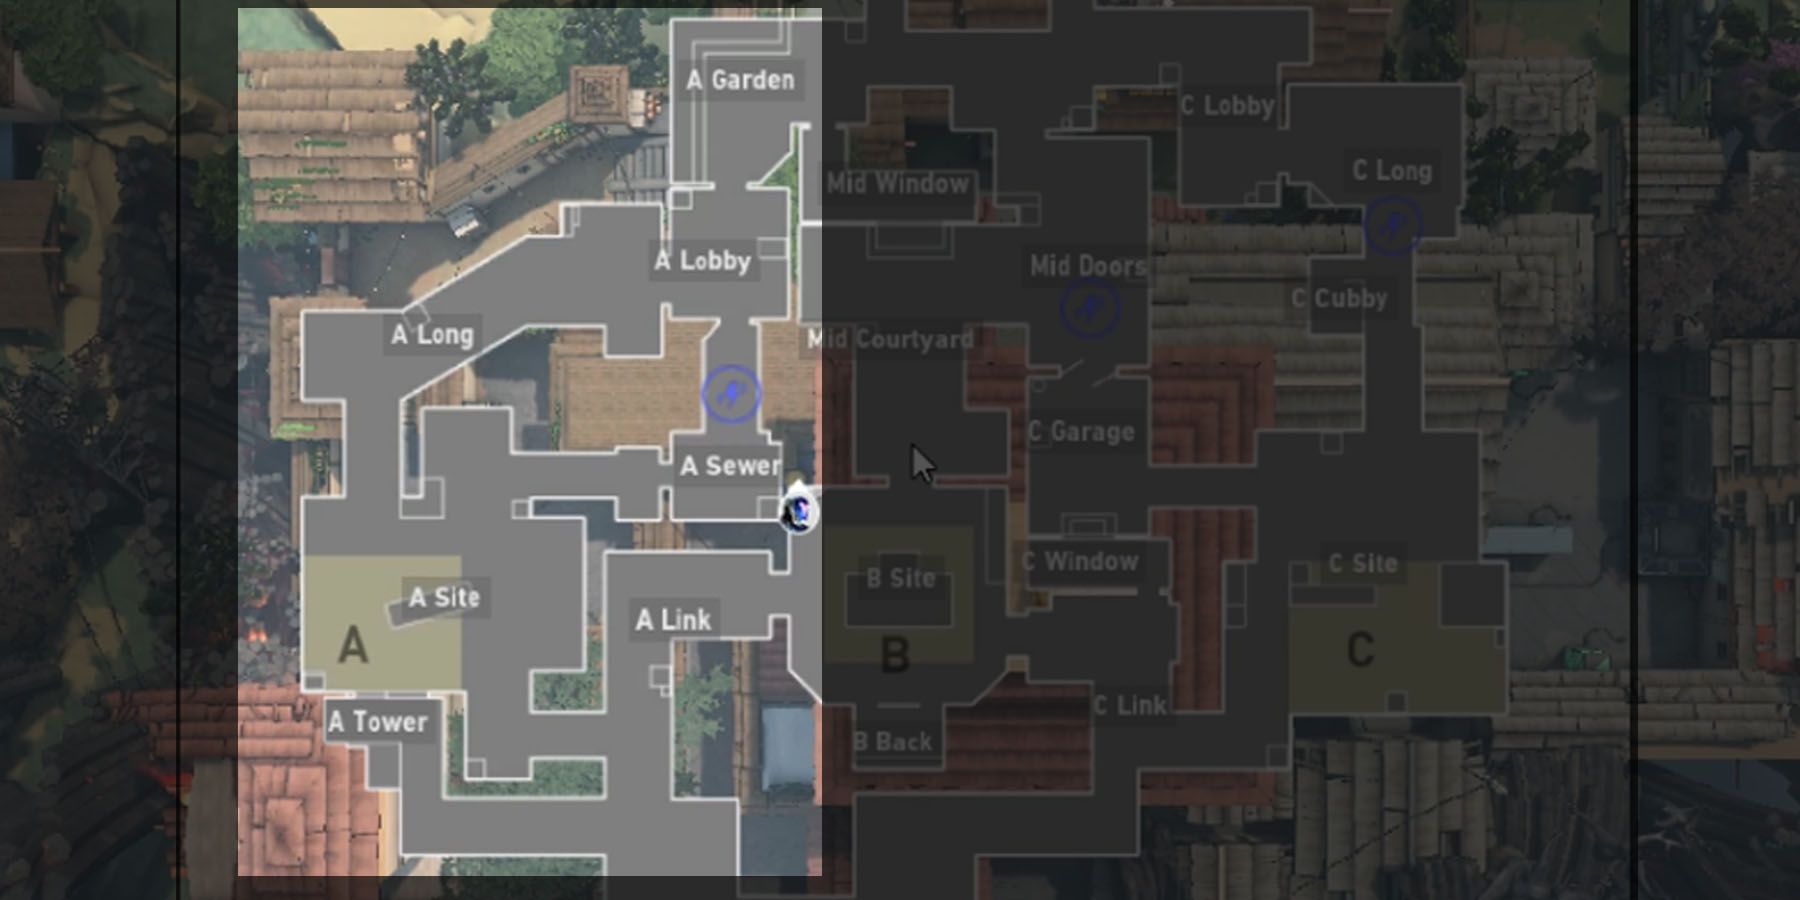
- No changes in Ultimate Orbs: The addition of a third Spike site doesn't change the number of Ultimate Orbs on the map, of which there are two (in C-Long, and A-Long).
- Destructible Mid-Doors: While the B-Site is arguably a bit more defensible due to entrances close to the other sites and the Mid-Door gateways, the doors aren’t indestructible. Rather, the doors themselves can absorb up to 400 HP each.
A-Site: Z-Axis Focus
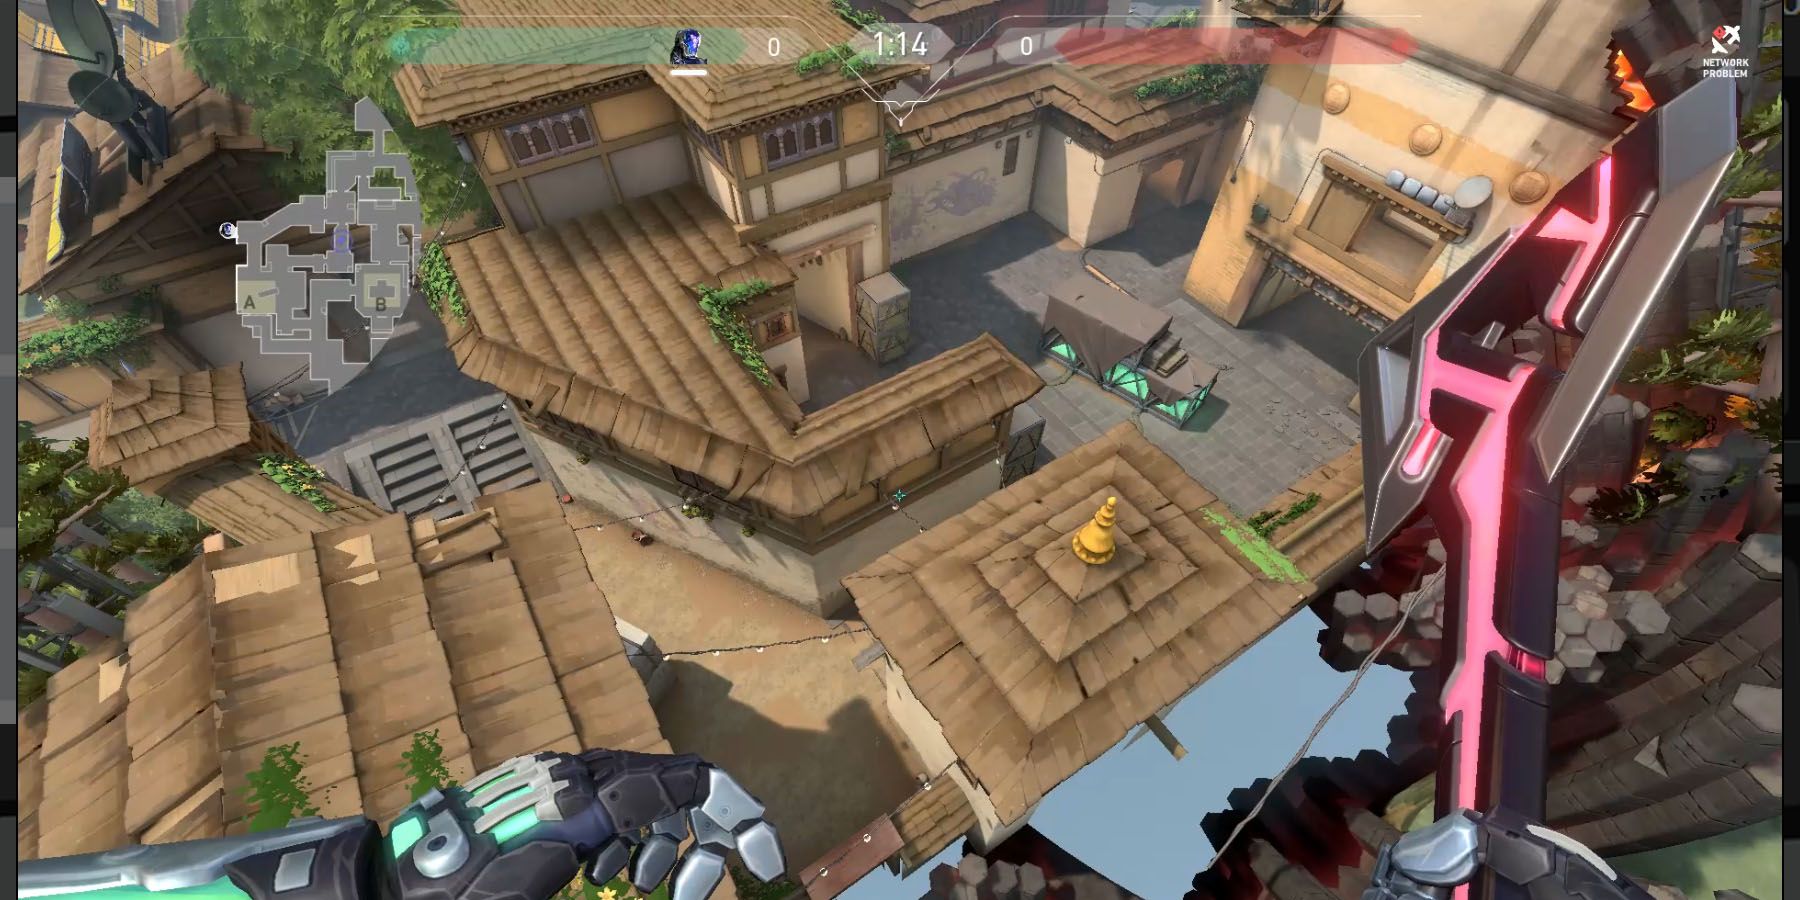
Perhaps the unique area in Haven, the A-Site is particularly treacherous for its focus on below-ground and above-ground incursions. Its ability to force players into account aerial and underground threats make A-Site particularly tricky to attack and defend, forcing players to take extra precautions when dealing with the location.
Features: Multiple Corners
Unlike the other sites, A-Site in Haven has a multi-corner approach regarding offense and defense. There are multiple entry points when securing access to A-Site that are straightforward, making Valorant firefights more direct. Here are things to consider:
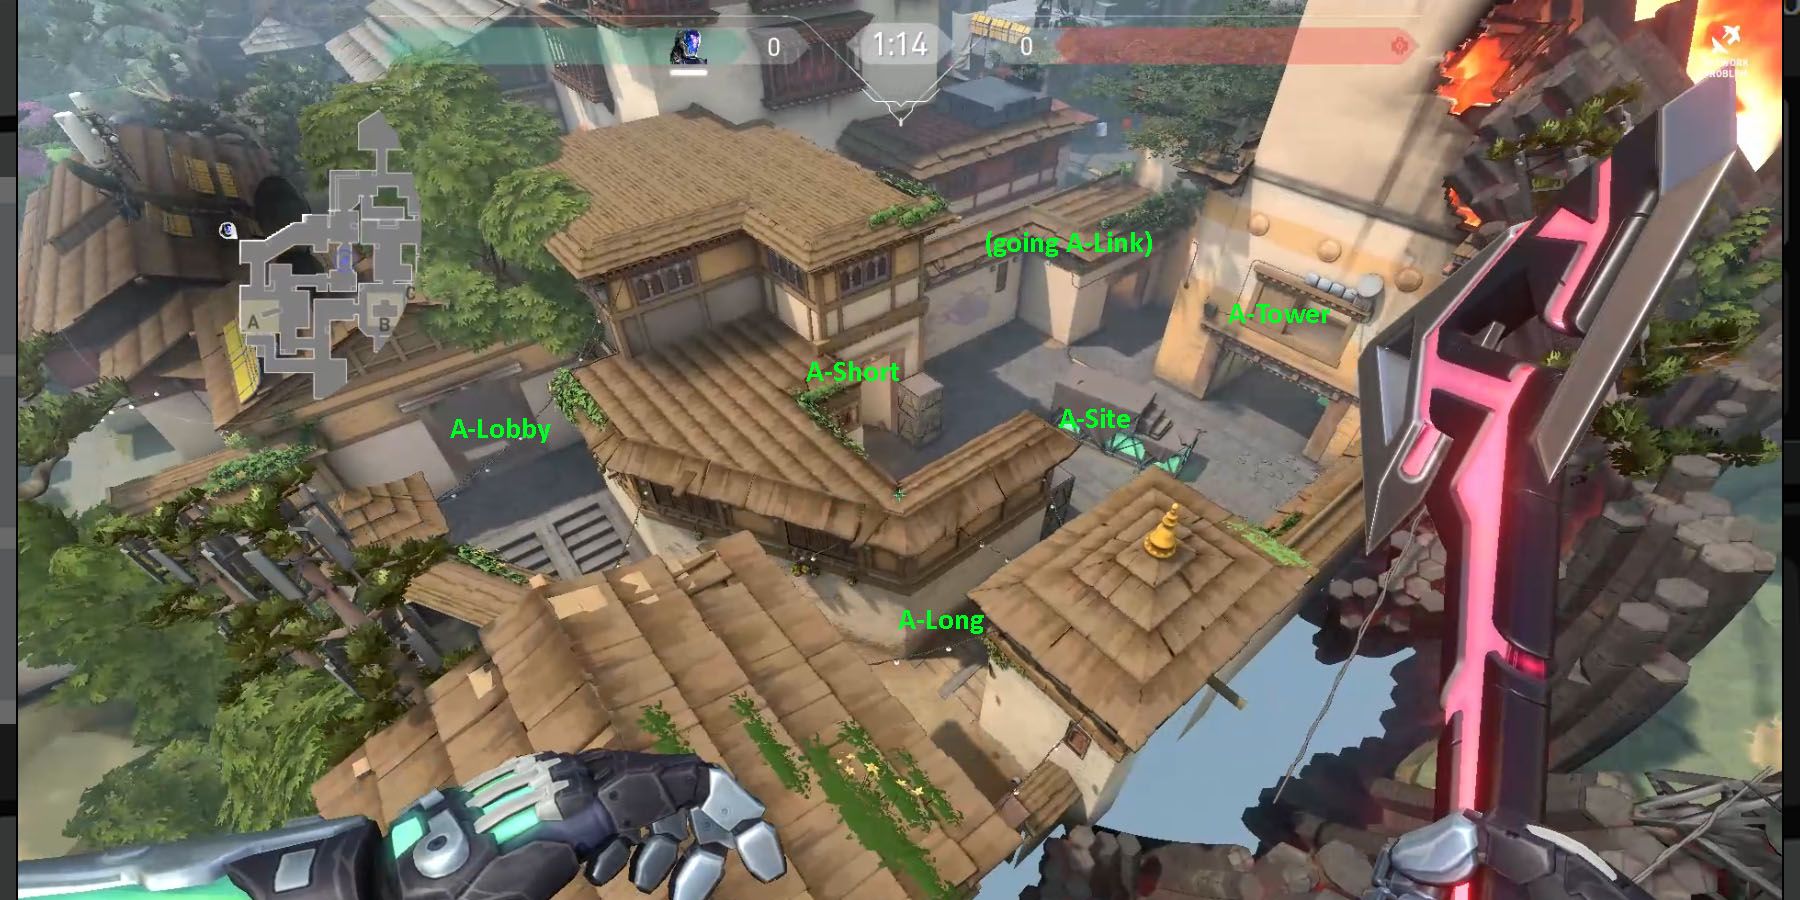
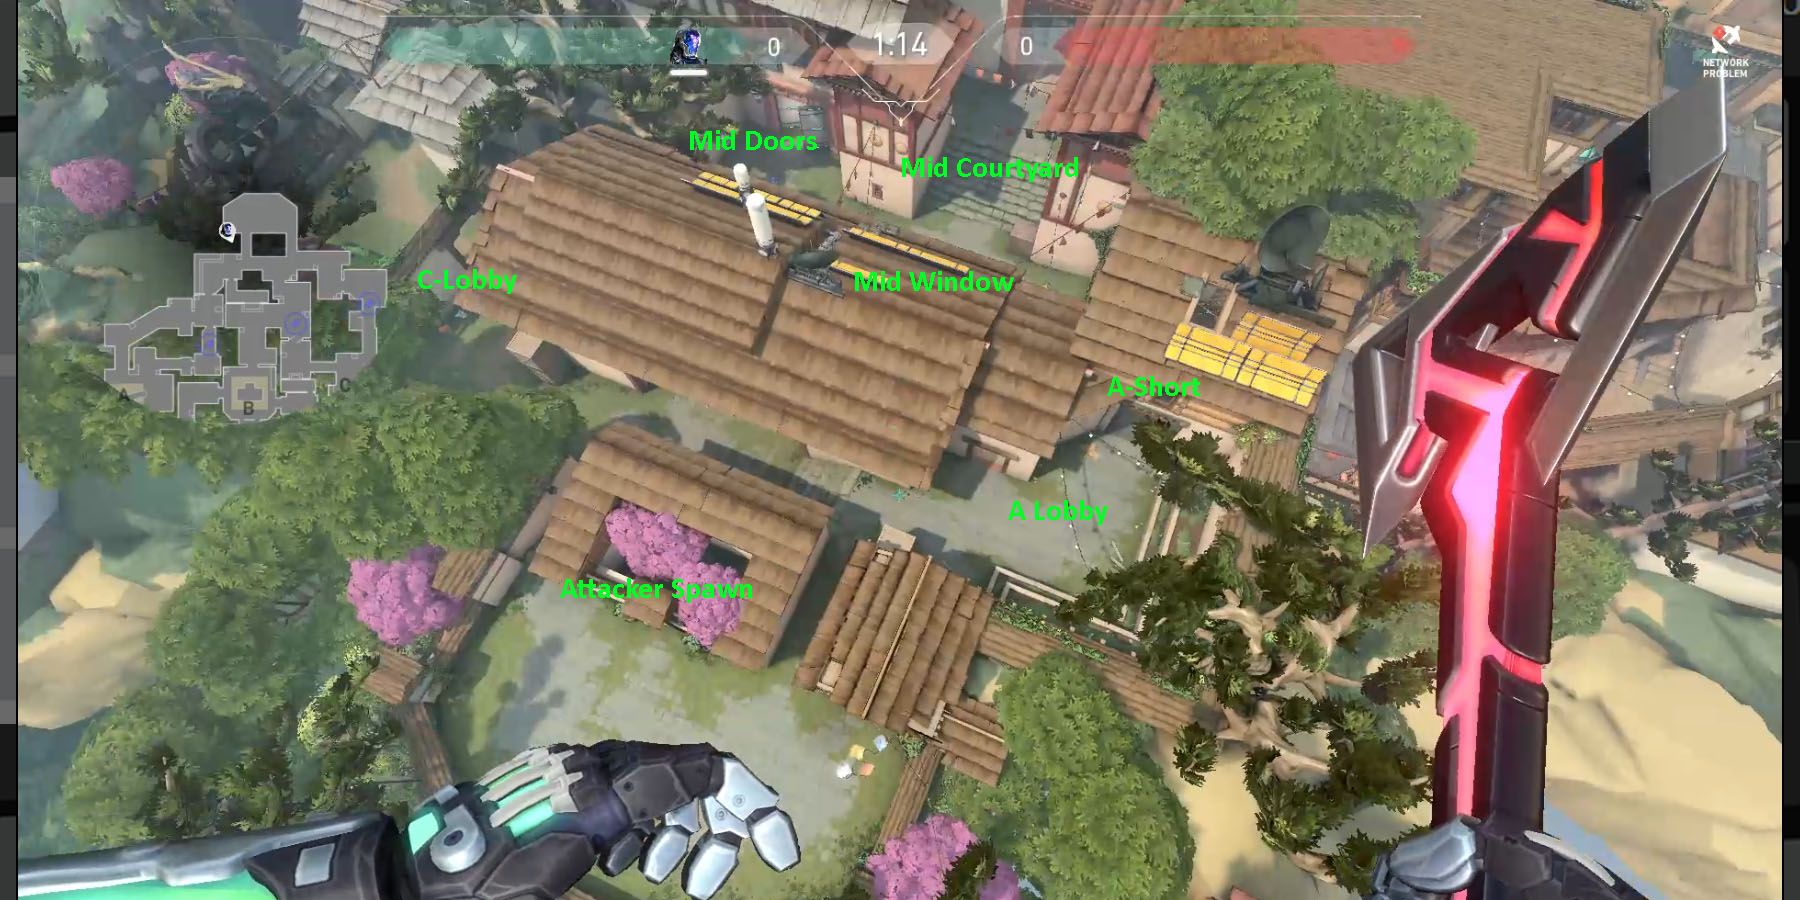
- A-Short: This corner is an extremely straightforward location compared to the rest of the map. Its easy access to A-Lobby makes it a nifty line of offense and defense, depending on who secures this first. Dominating A-Short gives a clear view of A-Lobby attackers or hints toward A-Site defenders away A-Site Proper.
- A-Tower: The most notable part of A-Site is the A-Tower, giving defenders a view from up top towards anyone who approaches from A-Long.
Offense: Remove Tower, Remove Defense
Despite the rather overwhelming image of defenders fortifying A-Site via the A-Tower and corner-hugging the entire site, players on the offensive need to remove one key variable from the defending side to practically dominate A-Site: A-Tower. Eliminating the Tower’s defensive position gives attackers a lot of openings to acquire A-Site for planting, especially when these areas are taken into consideration:
- A-Long: This is an expected entryway into A-Site, meaning it’s ideal to start barricading this location with smokes to hug the corridor at the end. This is a neat spot to catch flankers off-guard, especially those who want to try getting into Attack Side Spawn to sneak up on other attackers.
- A-Tower: The biggest threat to A-Site offense is the A-Tower, which is an ideal sniping position. A well-placed smoke or a properly-aimed projectile going into A-Tower is a great way to eliminate threats.
- A-Tower Garage: The area directly below A-Tower is rather spacious, making this a great hiding spot to defeat last-minute defenders with a trusty Judge or Shorty after planting the Spike.
- A-Short: Players hoping to get control of A-Site from below ground must first secure A-Short from above-ground threats. After ensuring there aren’t any enemies waiting at the end of the hall, players can eliminate threats trying to hide from the left cubby after exiting A-Short, and to the right cubby before the opening to A-Site.
- A-Link: This location, which is directly parallel to A-Short’s exit corridor, is the best place for defenders to transition from B-Site, Defender Side Spawn, and A-Tower to defend A-Site Proper. Players need to secure this area to avoid any unnecessary flanking.
Defense: Secure Tower, Secure Protection
Defending A-Site in Haven is pretty straightforward thanks to the presence of A-Tower. Securing A-Tower with someone who can handle their snipers like the Operator or Marshal properly can render certain locations useless, forcing enemies to flank or commit to a waiting game. Here are other elements they can consider:
- A-Tower: The main defensive line in A-Site, A-Tower overlooks the entire site and gives players access to attackers coming at the end of A-Short’s exit corridor and those entering A-Long. When defended properly, A-Tower practically prevents enemies from committing to A-Site.
- A-Tower Garage: The location directly below A-Tower is empty and rather spacious, making this a great place to ambush enemies trying to take A-Site. This is also a recommended post-plant hiding zone, meaning enemies will always try to secure this location.
- A-Link: The biggest “bridge” that connects A-Site to A-Tower, A-Link, and Defender Site Spawn, securing this location prevents enemies from using it to flank. Players can also use this to access other sites in case of emergency retreats.
B-Site: Essentially A Circle
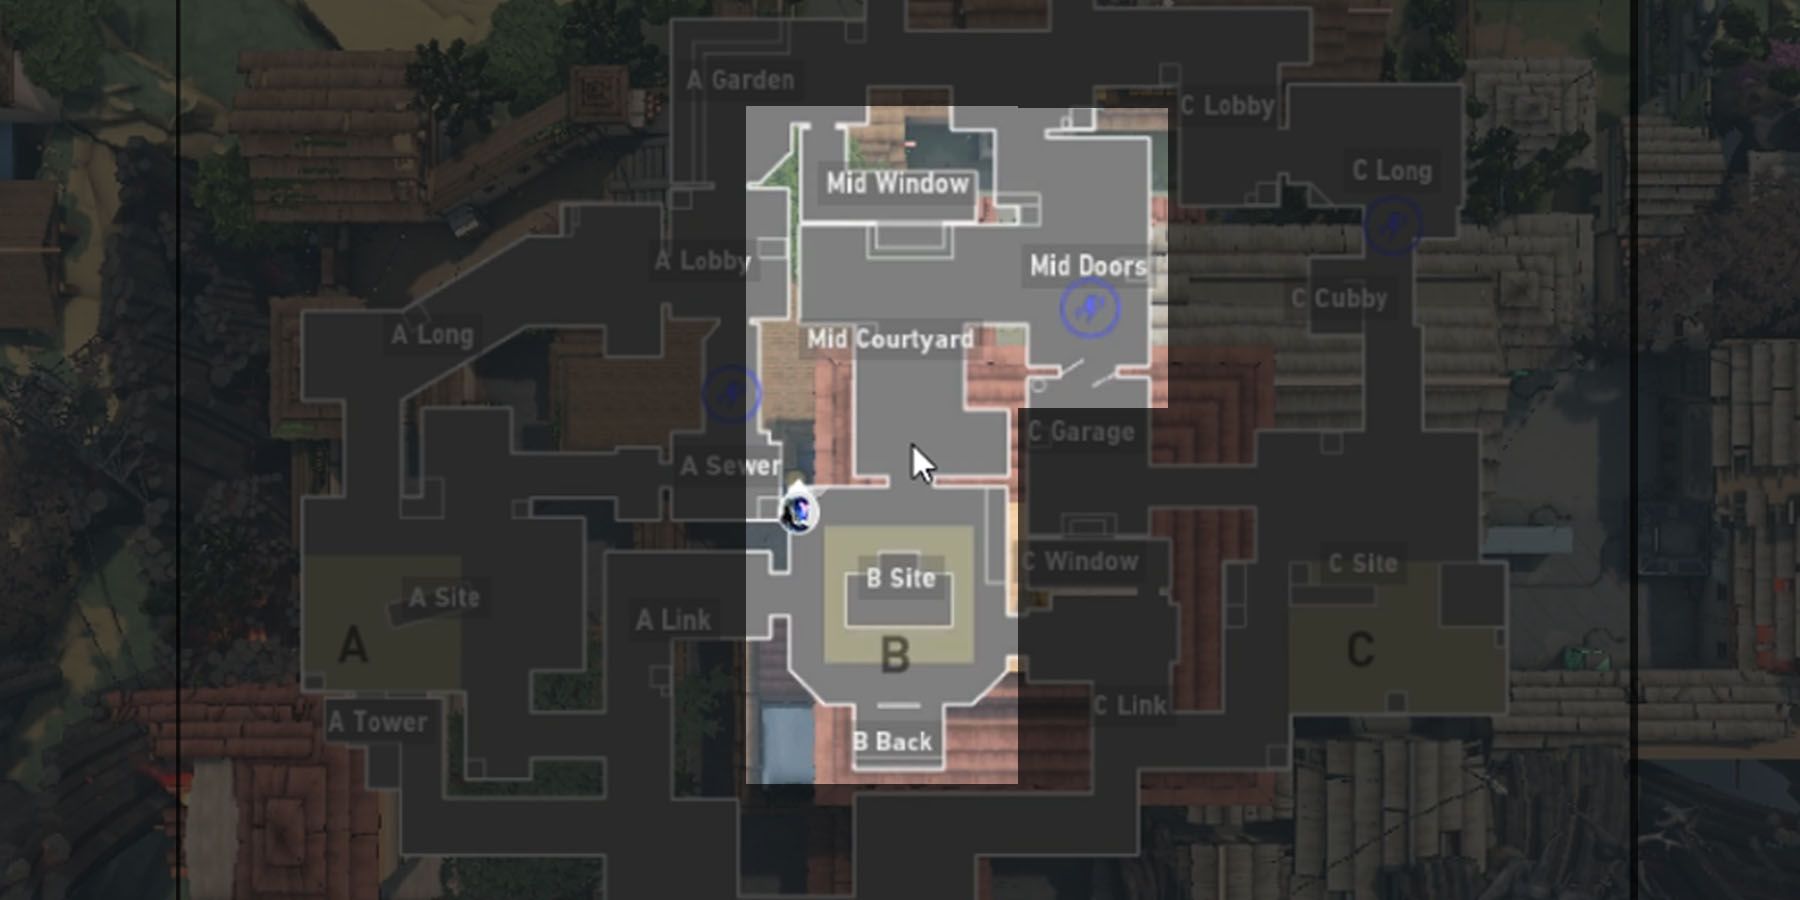
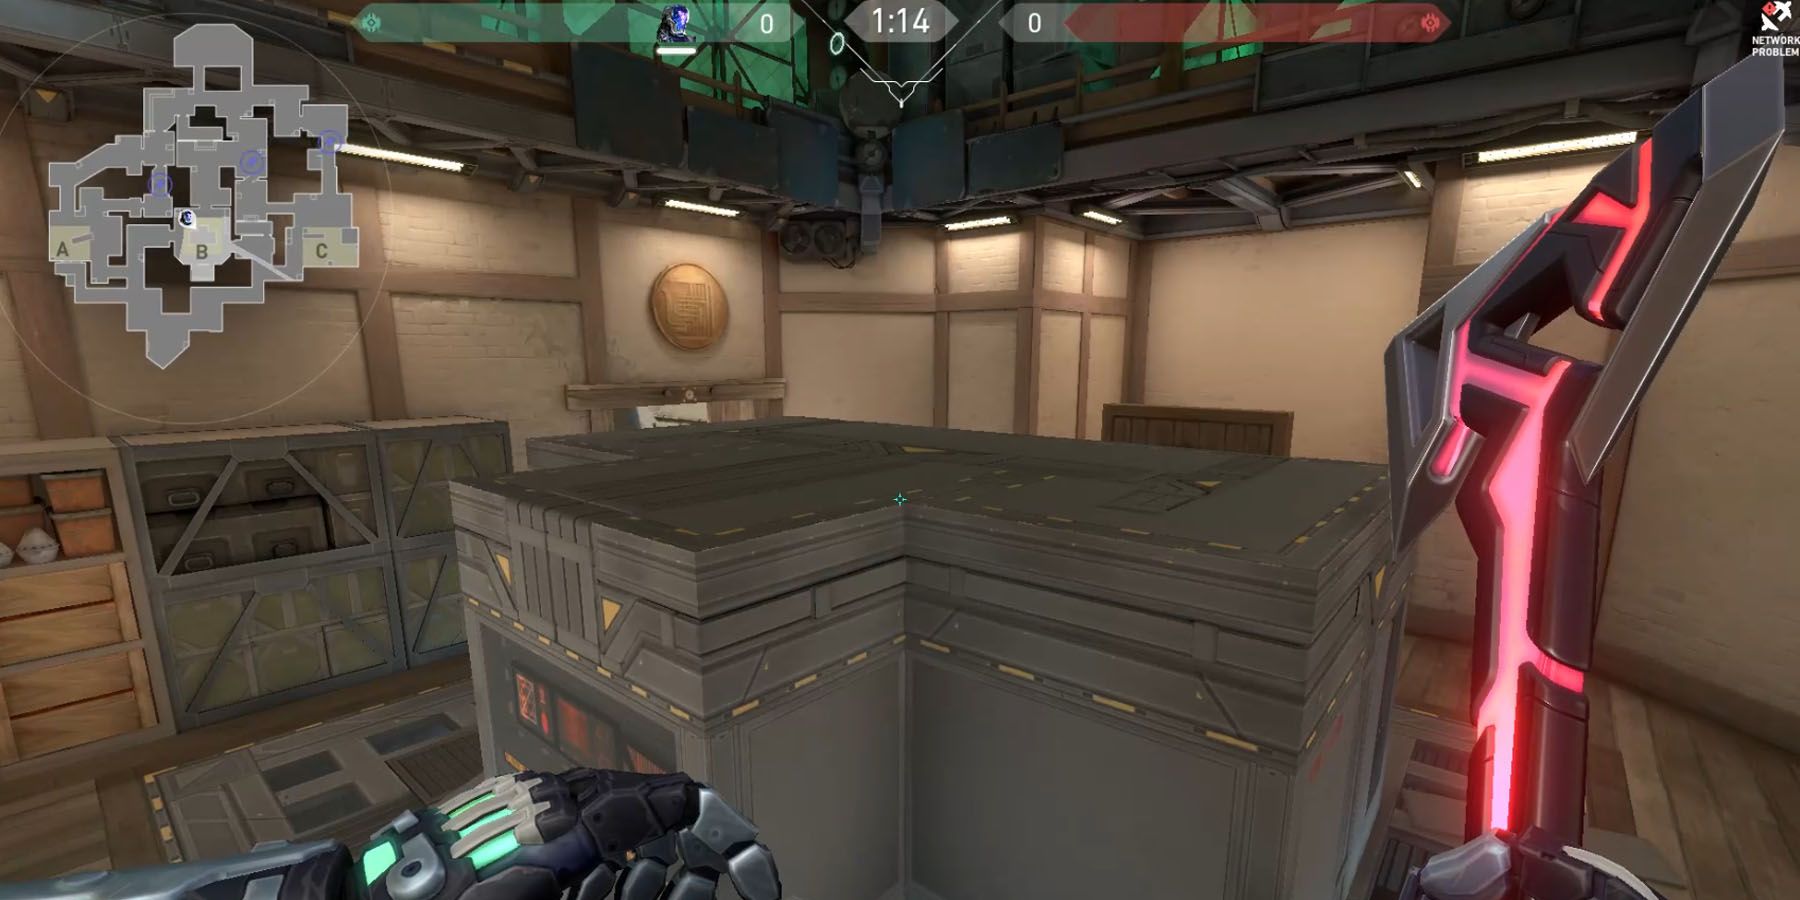
The Mid-Section of the Haven Map is essentially the location of the B-Site. Accessible from three areas, the B-Site is practically an interior rotunda, characterized by a confined close-quarters room with a generator-looking box in the middle that forces players to encircle the box to get to the other side.
Features: Straightforwardly Claustrophobic
Compared to the more open A-Site and C-Site, the B-Site is rather claustrophobic. This is because there are few areas to explore, both from an attacking and defending perspective. In terms of notable features, here are call outs to watch out for:
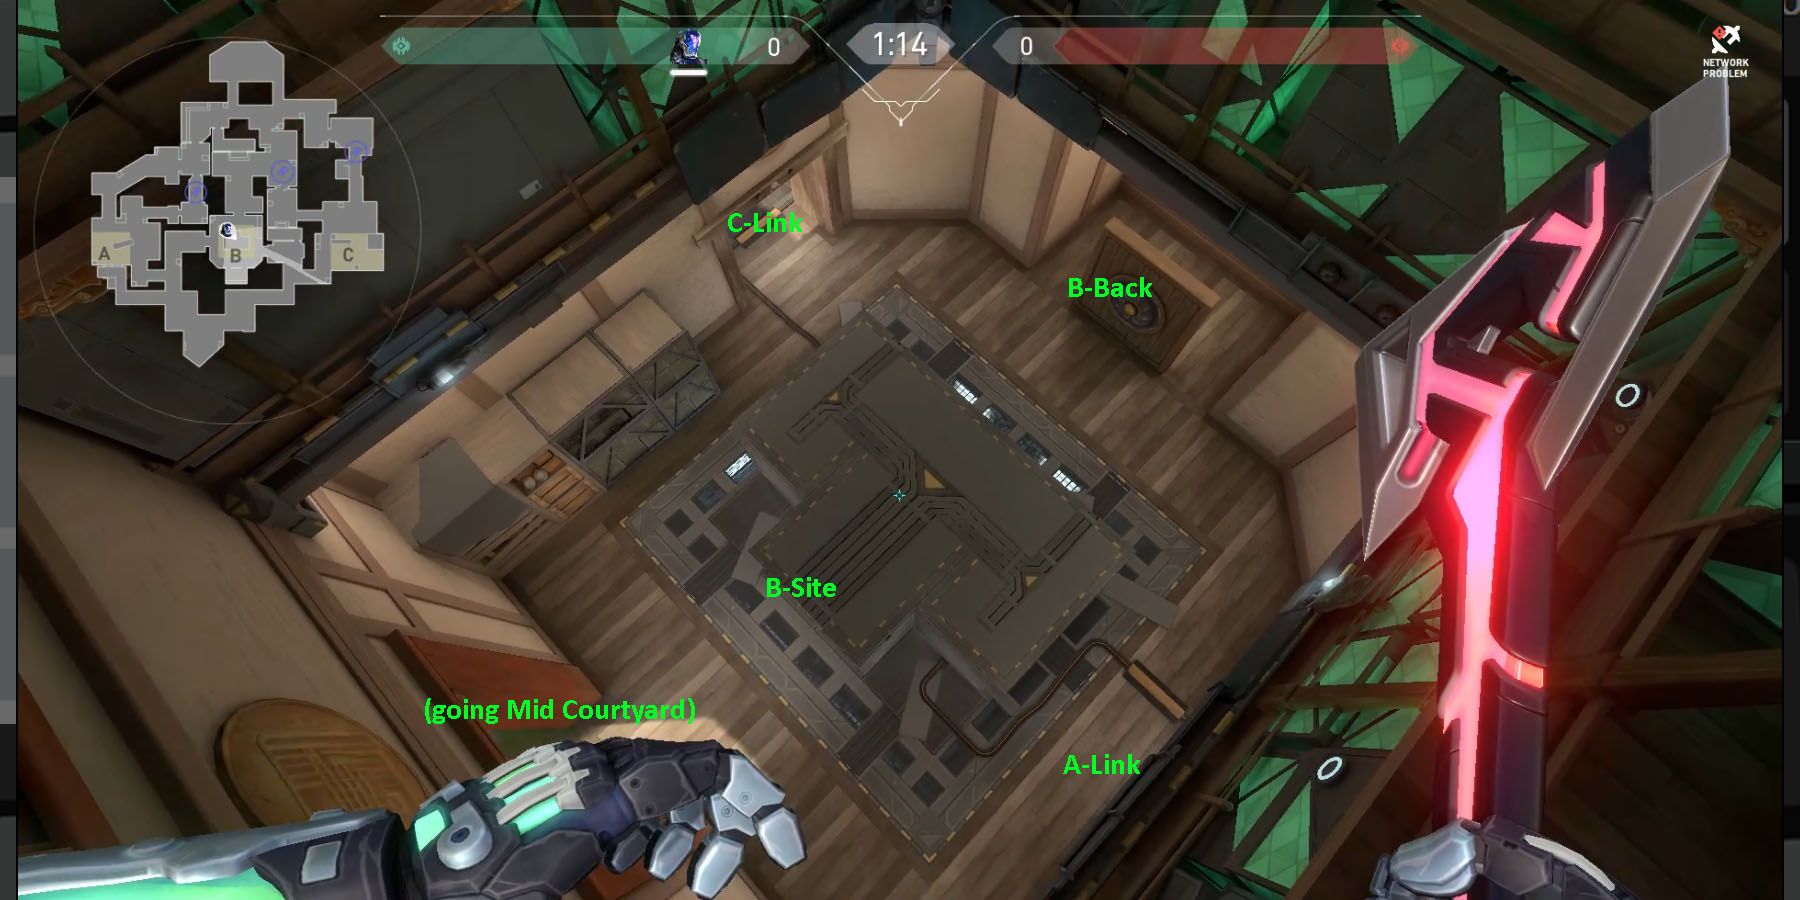
- Box: This is B-Site's central component, essentially a generator-type object. It has various corners where players can do plants, be it hidden or open by nature.
- B-Back: This is the location of a gong and a convenient back section that makes for a good defending position. The B-Back is situated at the rear of the Box.
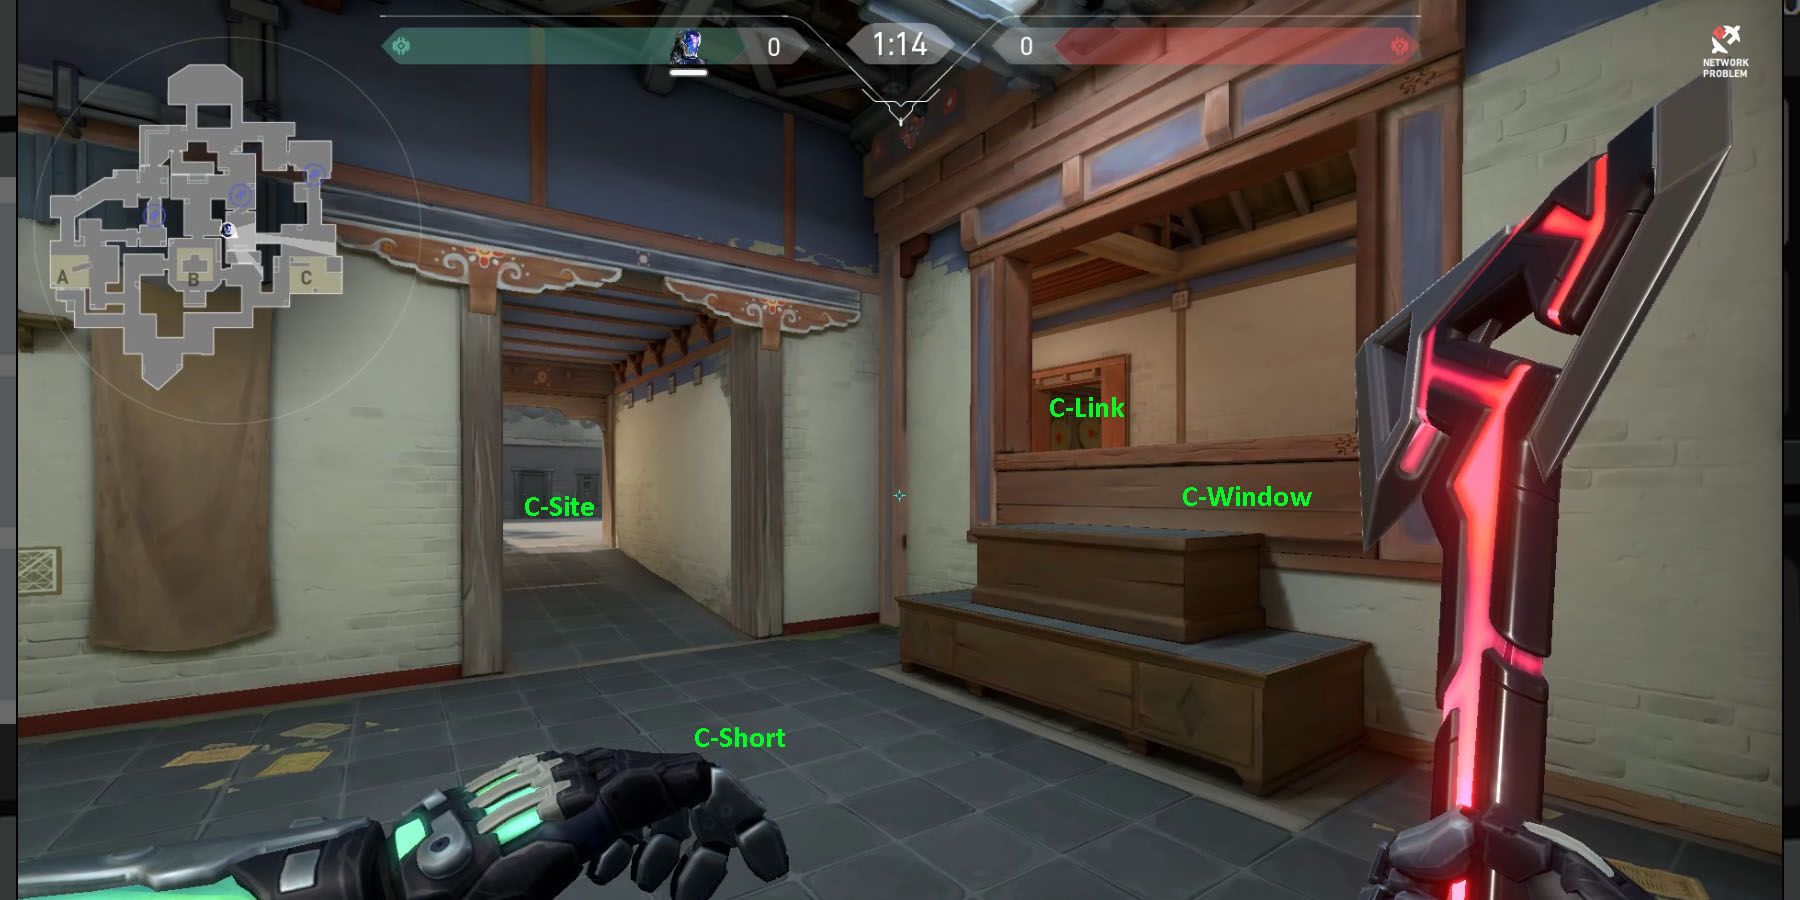
- C-Link: This short corridor leads into C-Link, a small alleyway that either leads straight into the C-Site or towards the C-Window.
- A-Link: This short corridor leads into two A-Site locations - A-Tower or A-Site proper.
Mid-Section: Straightforward Attack
Outside the B-Site is an external Mid-Section, which serves as the direct line of attack from the offensive side of the field if they decide to rush the B-Site. Fit for frontal assaults, this Mid-Section needs to be guarded carefully since it has convenient sniping points. Here are areas to consider:
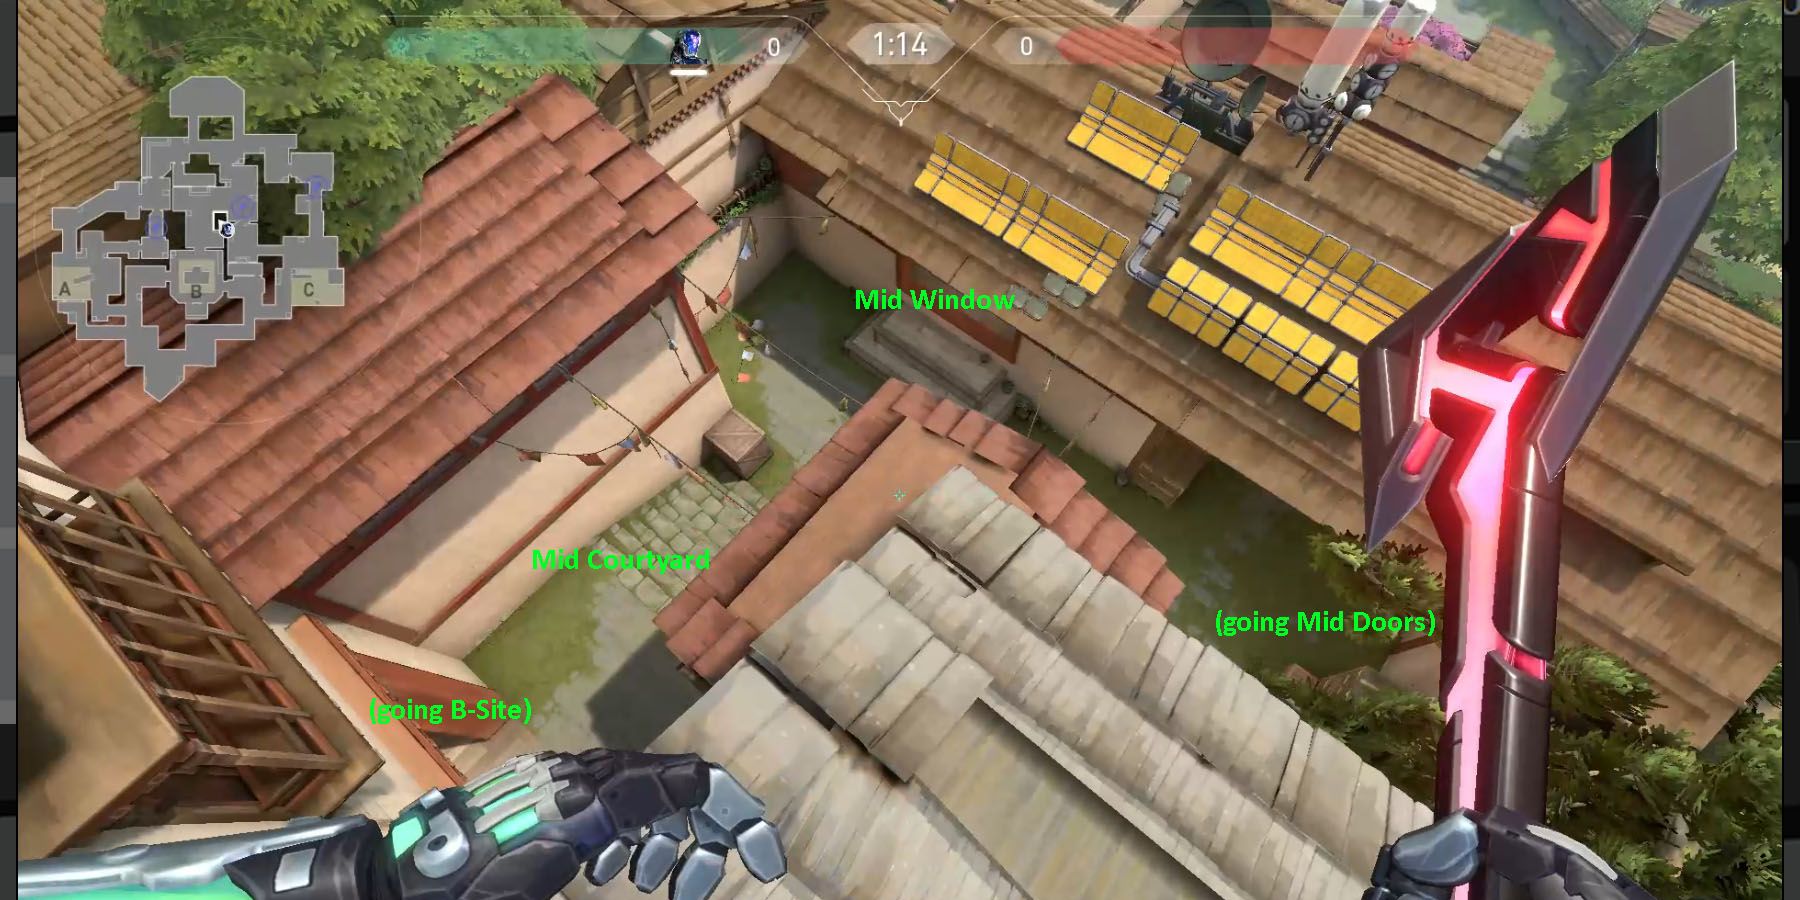
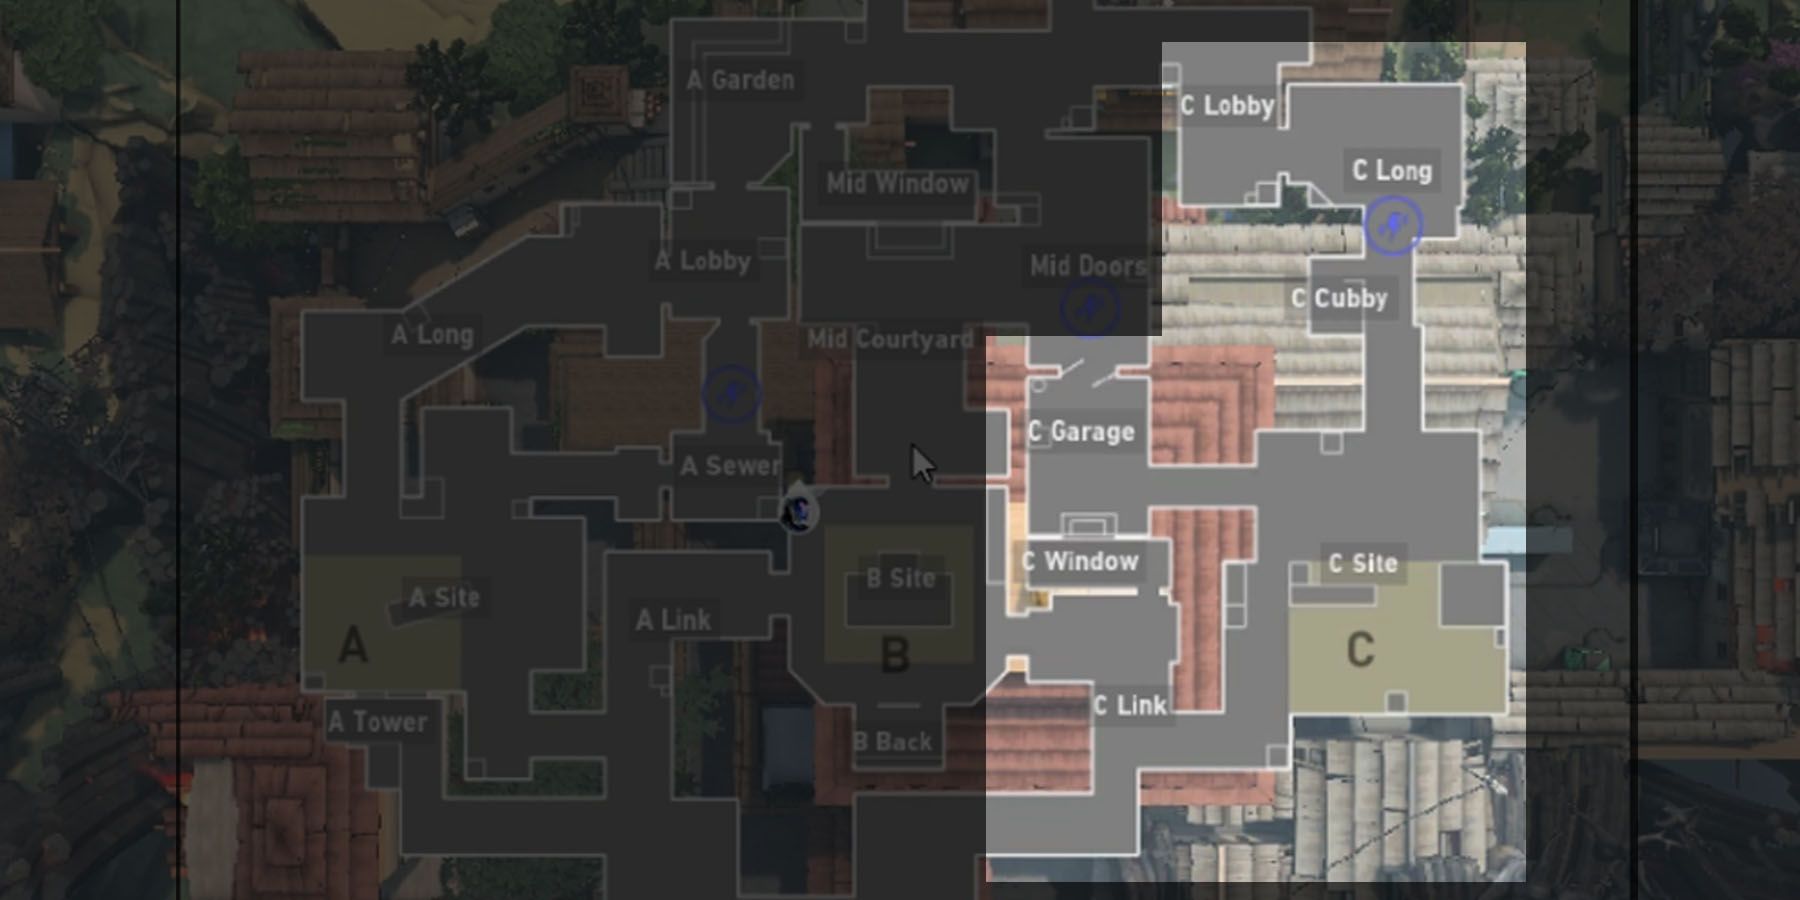
- Mid Window: A convenient sniping location, this is a corridor with an open side that enables players to snipe straight to the Box in B-Site. This works in reverse as well. Going into Mid Window heads straight into A-Gardens. Walling the area courtesy of Sage can add a lot of defensive options for B-Site.
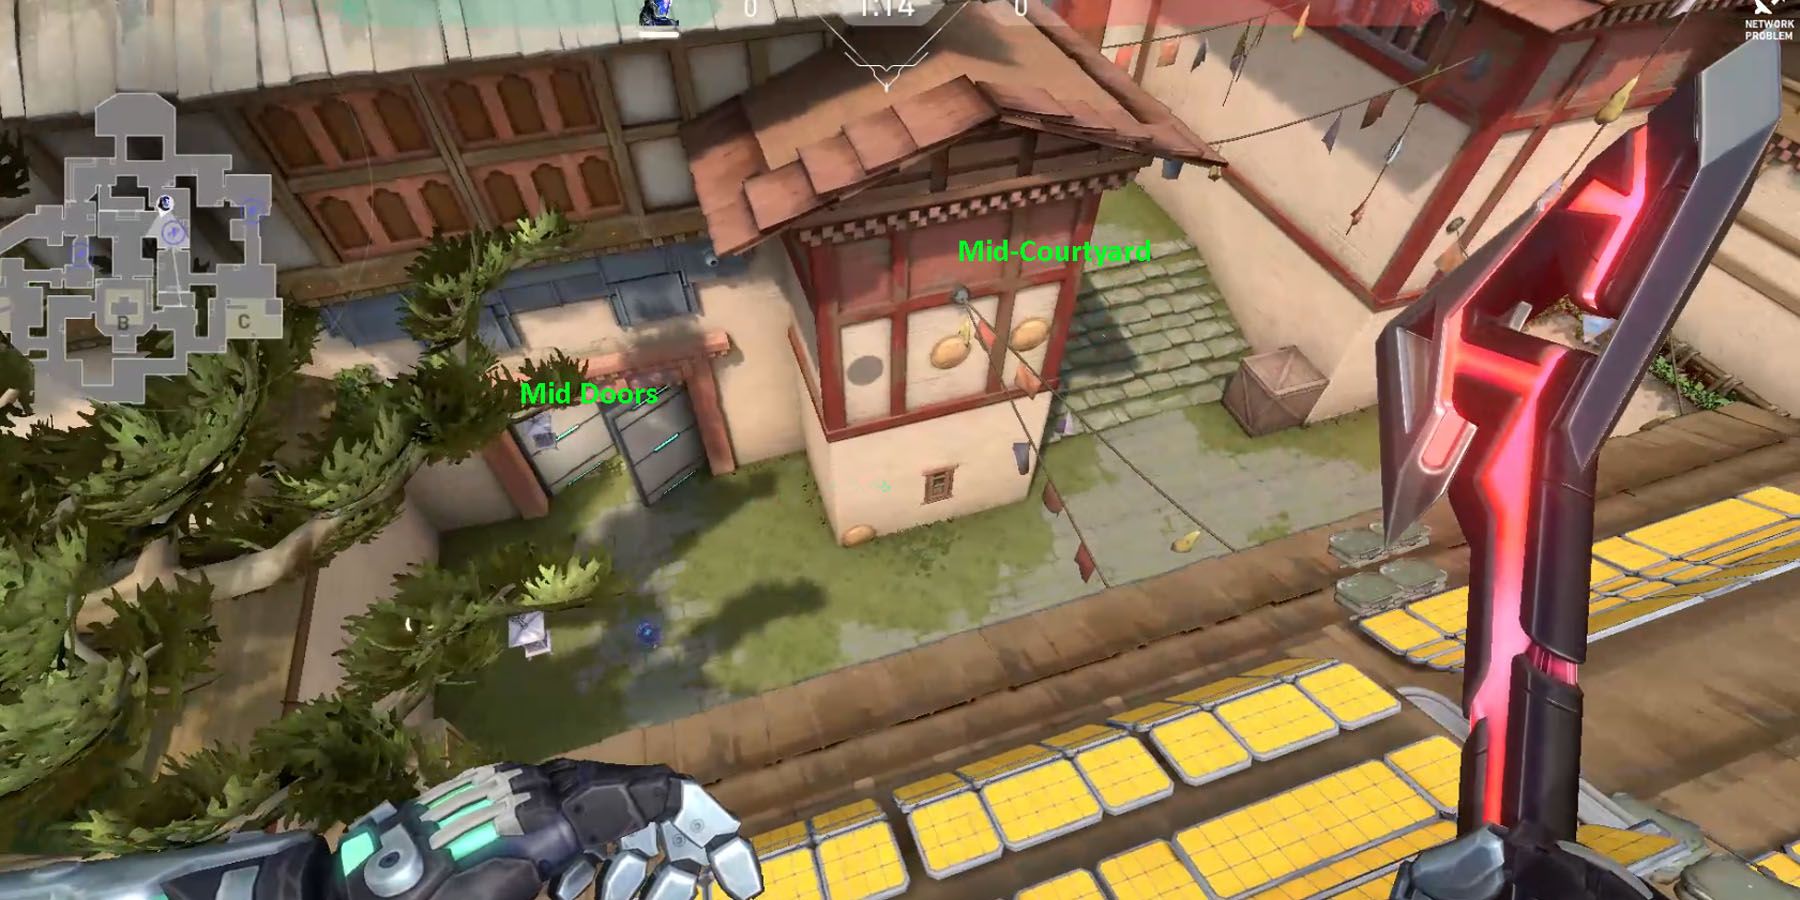
- Mid Courtyard: A straightforward, open area, this is a section that leads to the staircases towards the B-Site door. A long stretch of crates below the Mid Window leads to the Courtyard and may be a hiding spot.
- Mid Doors: These are two doors that lead into C-Short and the rest of the C-Site areas. Mid-Doors are a great way to escape from a B-Site Defense and get into a C-Site offensive when entering from the Attacker Side Spawn. Likewise, going from B-Site to C-Link can quickly lead to Mid Doors.
Offense: Straightforward Risk
One of the most relevant highlights of attacking the B-Site in the Haven Map is its straightforward nature. Attackers need to note that parts of B-Site can face the Mid-Windows directly, giving defenders easy access for sniping points. Here are certain things to take note:
- Mid Window: Projectiles from Mid Window can quickly reach the middle part of the core B-Site, but players need to consider defending snipers. The sides of the Mid Window area are also penetrable.
- Mid Courtyard: Although a straightforward set of stairs, there's the unnamed cubby-like area near the entrance that could be used as an ambush point for defenders or a decent peek spot for attackers.
- Mid Doors: Commonly used to access C-Short, the Mid Doors are a great way to access B-Site from a corner position. Players need to take note of defenders from C-Short who may flank a B-Site assault.
Defense: Multi-Joint Protection
While the B-Site is extremely accessible from the middle section of the map for attackers, the best way to defend B-Site is from entrances to other Sites. Peeking into Mid Courtyard could give defenders away to snipers from Mid Window, which isn’t recommended. Other ways of defending B-Site include:
- B-Back: An easy ambush position, staying in B-Back until an attacker enters the B-Site can be a great way to kill a Spike Carrier. It’s easy to rotate from B-Back to get to the other Sites.
- Mid Courtyard: Although going outside B-Site gives attackers access to defenders from this area, strategically entering Mid Courtyard can give defenders a stronger advantage when protecting the Site. Accessing the cubby-like corner adjacent to the B-Site doors can give defenders a neat ambush point for anyone trying to approach the opening.
- C-Link, A-Link: Defenders from C-Site and A-Site could use the Link elbows as a convenient way of hugging corners when enemies are trying to access the B-Site. It’s important for C-Site defenders to take note of C-Short going to Mid Doors, as enemies entering the B-Site proper may flank and approach C-Site from here.
C-Site: The Fight For C-Long
Compared to other sites in other Valorant maps, the C-Site in Haven is an extremely straightforward site in its approach. While it’s possible to secure the site via Mid-Doors and getting into C-Short, being spotted in C-Window practically calls the rest of the defenders to the C-Site while players are still working their way towards it.
Features: Race Against Time
Due to the prominence of range-prominent C-Long and up-close preference in C-Short/C-Window, committing to C-Site is always a race against time about how fast a team can secure it. Here are some notable positions:
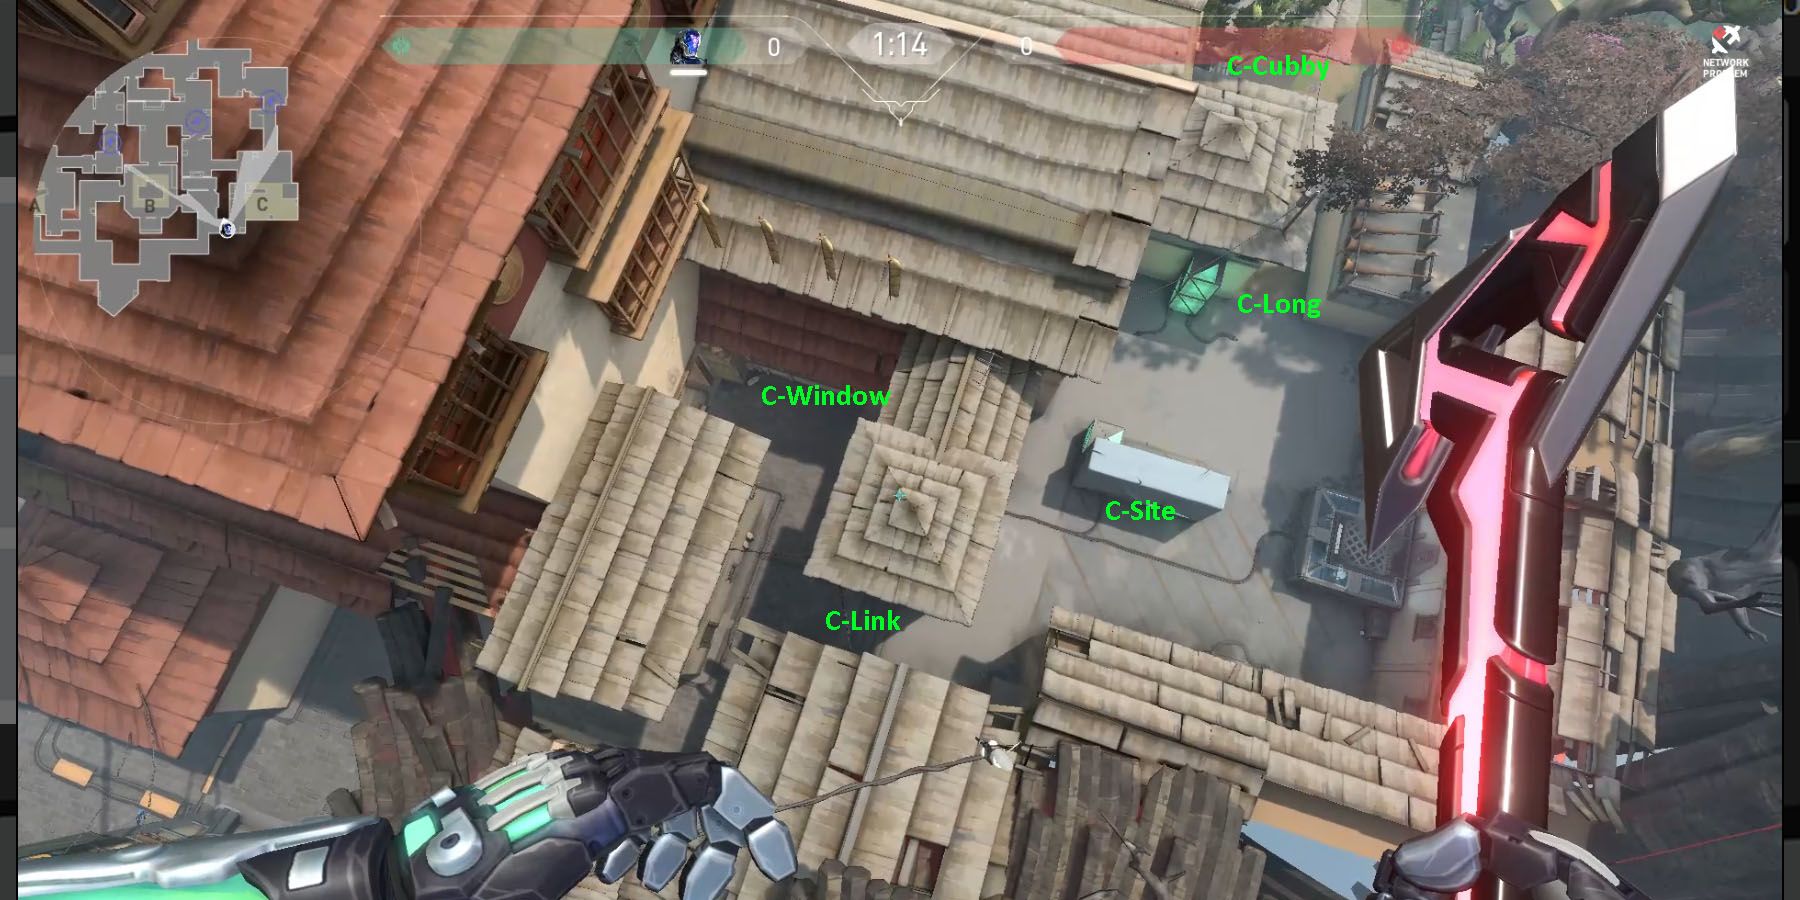
- C-Window: Aside from being a defensive platform against Mid Doors, C-Window has the best access to C-Link and goes into B-Site plus Defender Side Spawn, making this an ideal shortcut for quick scouts like Skye.
- C-Cubby: Despite the vulnerable position players are in regarding C-Long, C-Cubby is the best line of defense due to its convenient mid-point placement. Hiding here can give both attackers and defenders a considerable advantage in area coverage.
- Mid Doors: Careless players who don’t pay attention to Mid Doors and C-Short can have either side flank using this position, especially since C-Short reaches C-Site much faster than other pathways in other sites.
Offense: Exert Pressure
The straightforward nature of C-Site remains its weakness from a defensive standpoint. Maintaining pressure from C-Long and pushing for the attack allows players to dominate C-Site early on and secure the site, leaving them with a lot of time to fortify their other defenses.
- C-Short/C-Window: Securing C-Site using this alternate route via micro-flanking is a nifty way to capitalize on the annoyance of enemies dealing with the team’s sniper in C-Long. Smoking or mollying C-Short and eliminating threats from C-Window practically reinforces the team’s claim on C-Site.
- C-Link: Players may want to resecure the flank by defending C-Link from any potential trespassers from Defender Side Spawn and B-Site. This area is dangerous for Raze and her Ult which can take down entire areas.
- C-Cubby: Once players secure the approach from C-Long and get to planting, C-Cubby becomes an ideal defensive site post-plant. Waiting for enemies to pass C-Long for a quick kill is a surefire way to deter any refusal attempts here.
- C-Site Proper: The corner perpendicular to the crates and hugging C-Short and C-Link is a nifty rat spot to anticipate anyone coming from the two (2) locations, especially since the corner is rather tricky to spot unless players actively look.
Defense: Secure Mid Doors
An offensive assault on C-Site will likely happen from either C-Long or C-Short. However, the sheer chaos of a direct firefight in C-Long means there’s no need for multiple people to engage at once, especially since a constant sniper from the defending team can deter the enemy’s approach from C-Long. This means the likely point of secondary entry is via Mid Doors, which needs to be a defense focus here. Things to consider are:
- C-Long: While attackers from C-Long aren’t always a diversion, careful management of multiple threats here can delay a direct assault. A sniper accompanied by the occasional blinder like Brimstone may be able to defend C-Long long enough to force enemies to go Mid Doors or use another site entirely.
- C-Window: Perhaps the best vantage point to defend C-Short, C-Window has a convenient view of Mid Doors and is angled enough for a proper molly toss to hit the door properly, potentially damaging door-huggers.
- Mid Doors: Players must spot threats carefully here in Mid Doors to deter their entry into the map. Using a detection skill around this area can force attackers in Mid Doors to retreat, either to commit to C-Lobby/C-Long or pursue the equally-accessible B-Site.
Agents: Area Coverage Is A Priority
Due to the multiple entrances and exits across Sites in Haven, it’s essential for Agents to be able to navigate from one area to the next rather quickly. Agents ideal for Haven are those capable of covering for allies while simultaneously eliminating opportunities for flanks, making assaults consistently and effective. Here are ideal Valorant Agents that can excel in the map:
- Omen: This Controller is an extremely valuable asset in Haven, particularly for his smoke regardless of distance. He can quickly seal off exits and potential push sites and teleport on the defense rather quickly. When on the offensive, Omen can close off Sites for the plant while allies pick off enemies.
- Cypher: This Agent is easily one of the best Sentinels to use in Haven, especially due to the quick deploy-and-go nature of his toolkit. He can easily leave his Trapwires and Spycams in one area while he rotates, and then retrieve them just as quickly if enemies decide to push elsewhere.
- Sova: One of the premier detectors in the game, Sova as an Initiator is one of the best to use in a tightly-knit map like Haven. The vast scope of his sensors allows him to view not just one Site but the mid-point between one Site and the next, allowing the team to predict potential assault points and delay the enemy's advance.
- Reyna: Given the tight corners, multiple entrances, and exit points of the Haven Map, a blind specialist like Reyna is key here. Her multiple blinds and life-steal makes her a viable asset for rotations, allowing her to peek and blind attackers on the defense and even overwhelm the defense with her silence on the offense.
Harbor arrives as the newest Agent in Valorant on October 18, 2022 alongside the Episode 5 - Act 3 update.

