


Quick Links
With the distractions of the Gold Saucer behind you, it's time to get back onto the road in the next chapter of Final Fantasy 7 Rebirth. In addition to the last bit of Corel, you will get a new region to explore known as Gongaga. This is a lengthy chapter that gives you plenty to do if you want to take time to get involved with the open world side quests and content. Here is what you can expect as you begin Chapter 9: The Planet Stirs.
This walkthrough contains spoilers, so proceed with caution.

Final Fantasy 7 Rebirth Review
Final Fantasy 7 Rebirth is an epic-scale adventure with an unforgettable cast of characters that will keep players busy for dozens of hours.
To the Reactor

At the start of the chapter, you won't have any control over the Buggy. Simply sit back and enjoy the ride and dialogue. Eventually, you will gain control of the Buggy and will be presented with the controls for it. There are several towers to activate along with a Lifespring in the area. While there are no new side quests (yet), you can certainly take this time to focus on some older ones if you want.
The towers in this area will require use of the grappling hook, so keep that in mind.
When you are ready, head south toward the reactor. Once you reach the spot on the map, you will enter a new region: Gongaga. Unlike Corel, Gongaga is a lush jungle. Since it is a new region, there will be towers for you to activate and gain more information about the area. The village that Cait Sith mentions is far to the south, so follow the blue waypoint to reach it.

Once you arrive at your destination, you will trigger a cutscene as you run into a familiar face from Crisis Core, Cissnei. After the cutscene, follow Cissnei and then go down into the village. At the house with the rest station in it, there is a chest that contains a weapon for Yuffie.
In order to advance the story, head to the location depicted in the image above, which is the house that Aerith goes into. After the cutscene, talk to Aerith outside. During this conversation, you will have the option to comfort Aerith in regard to Zack's parents. Once the conversation is over, head to Cissnei's house to get some rest. Approach the bed and select "Until it's time to leave" to advance the story.

Final Fantasy 7 Rebirth: Gongaga Region Protorelic Guide
Final Fantasy 7 Rebirth players will have complete four challenges to get the Gongaga Region Protorelic.
Investigate the Reactor

Downtime comes to an abrupt end as Yuffie will burst in and inform Cloud that something is going on at the reactor. After the cutscene, head south towards the remains of the reactor. As you approach the south exit of the village, the guard will allow you to pass.

The reactor is significantly further away than it looks. While you are en route, you will come across a tower that can be activated. While doing so is optional, it will get you more Party EXP and intel for Chadley. Not to mention, it will also become a fast travel point for later. Once you arrive at the reactor, go under the hole in the gate on the left. Following the cutscene, approach the vending machines.
To your right will be a set of stairs that lead down into the facility. At the bottom of the stairs is a long hallway that leads into a larger, open room with a small group of enemies in it. After entering the next room, look to the right to find a chest that contains a weapon for Cloud.
After you have looted the chest, head back into the previous room and go through the door that is barely open. While going through this next area, you will see a Whisper flying down the hall to your left. Before chasing it, go right into a side room with some enemies. Look to your right to find a hole in the wall that leads into another room with a chest in it. There is also a hole in the wall that allows you to drop back down into the hallway.
How to Restore Power to the Door

Along the walkway, look to your right to find a set of stairs that will take you down. Once you reach the bottom, swim across the small body of water that Barret and Cait Sith complain about. Halfway through this area, you will be ambushed by a small group of enemies. At the end of the hallway is a terminal, but unfortunately, it doesn't have enough power to operate.

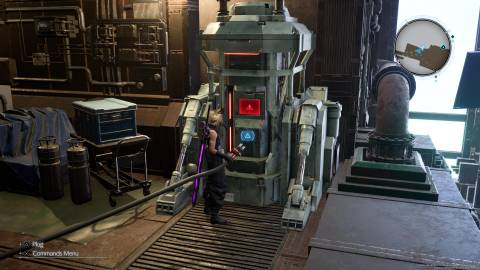
To fix this, go up the platform to your left and pick up the cable that is on the ground. Hold down L2 to pick it up (keep L2 held down or else you will drop the cable) and take it to the terminal. Press the Triangle button to insert the cable and the door will open. On the other side of this door, you will see three Whispers that fly away. Go through the door on your left to get past the barricade.
Once you are on the other side of the barricade, go down the hall directly in front of you. Up on a platform in the next room are a couple of Grandhorns. Clear them out and then go across the broken walkway where you will see even more Whispers show up.
How to Raise the Water

Go down the ladder and then swim to the left toward another ladder. Go up this ladder and then up a set of stairs to find a door that is partially open. This leads to the control room where you will find another terminal with no power. Go to the left to spot a cable. While it is blocked off by a box, you can fix that by approaching the box and then holding down L2 to pull it back.
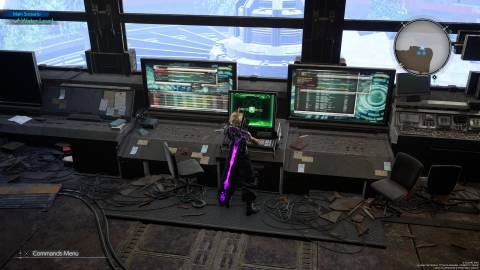
This will allow you to pick up the cable and plug it into the generator directly ahead of it. Head back to the box you pushed and then climb up it to reach a small side area with a chest that contains a Golden Collar for Red XIII. Head back to the control room and activate the console next to the large window. Head back down and you'll be able to swim over to where the Whispers were seen earlier.
This will lead you to an area with a rest station and a couple of vending machines. Make good use of them before proceeding, and also grab the green materia in the corner. Once you are ready, go down the other part of the hallway that leads outside.
Immediately after the cutscene, you will fight a couple of Amalgams. Despite their intimidating and grotesque appearance, they aren't particularly tough, and they are weak to fire. When they unleash spores, move back and wait for the surrounding cloud to clear. After killing them, jump across to the next platform where three more Amalgams will attack. After they are dead, it's time for a real fight.

Final Fantasy 7 Rebirth: All World Regions, Ranked
The world of Final Fantasy 7 Rebirth is a massive expansion on what was included in the original game, but some of its regions are better than others.
How to Beat Specimen H1024

Hojo has always excelled at creating horrific abominations that stand between you and your next objective, and he has succeeded once again with Specimen H1024. This monstrous creature is weak to ice damage. When the boss casts Mako Expulsion, move away to avoid getting hit by the blast. Keep hitting it with ice attacks to pressure and stagger it. Then, once it is staggered, unleash any Limit Breaks you may have active along with any Synergy Abilities.
Once the boss reaches 50% health, an in-battle cinematic will play and the fight will resume. The boss doesn't do anything new in this area, but it does seem easier to pressure it during the second phase. As the boss gets low on health, it will go berserk and will attack far more aggressively. Try to save some ATB actions for healing as the fight draws to a close.
Expedited by Chocobos

After the battle, you will switch to Tifa and the others. Follow Cissnei down to the chocobos. With the chocobos and their ability to jump on mushrooms, you'll have no trouble getting to the reactor significantly faster than the other group did. Once you arrive at the reactor, deal with the Shinra forces guarding the entrance.
With the grappling guns that Cissnei gave you, you'll be able to quickly get over obstacles. Go down into the reactor the same way that Cloud and the others did by going down the stairs past the vending machines. Keep going until you enter the hallway filled with water. Swim to the next platform, turn around, and use the grappling gun to get up to the next floor.

Keep looking for ways to go up. Eventually, you will come across a large room with enemies and another generator with no power. The cord can't reach the generator in its present state, so look to your right and use the grappling gun to get to the next floor. Kill the group of enemies up ahead and then turn around to find another grappling gun spot that will take you up to the next floor. On this walkway, use the grappling gun to get to a platform that will take you right to the power source the cable is connected to.

Push the power source all the way to the end of the track and then use the nearby rope to go back down. Grab the cable and insert it into the generator to open the door. Use the grappling gun to go up to the next area where a large group of Shinra forces are on standby. Try to deal with the Riot Troopers first, as they will move and try to protect other soldiers from your attacks.
After dealing with Shinra, go left through the overgrown ruins and use the grappling gun to reach the top of a rusty platform. Drop down onto the circular platform and take out the robot enemies patrolling on it. The path forward is pretty linear from here. Use the grappling gun when needed. When you reach the area with the rest station, take out the robots and make use of the vending machines if needed. When you are ready to proceed, look to your right and use the grappling gun to go up to the next area. Move quickly as the Shinra helicopters will be shooting at you.
How to Beat Crimson Mare Mk. II

Right from the start, the hand sabers will be targetable on Crimson Mare Mk. II. This boss is weak to electricity, so hit it with Thunder or Thundara whenever you can. As the fight progresses, the boss will switch to using makocannons instead of sabers. Destroy them as well as this will build up lots of pressure on the boss. Once you've destroyed enough arms, the boss will become very easy to stagger.
After Crimson Mare Mk. II recovers from the stagger, it will gain two new arms. These gauntlets will periodically detach from the boss and fly around the arena. Focus on dodging their attacks, as even if you do manage to land some hits, they will still damage you if you are too close. Destroy the arms and focus on the boss until it is destroyed. After the boss battle, Tifa will be on her own. Quickly rush up the platform and use the grappling gun to get closer to her. Once you get close enough, a cutscene will play.
Memories

Don't get too distracted by the clear visuals and light show of the cutscene that plays next. Soon as the two kinds of Whispers show up you will have to hold down L2 and R2 at the same time. Shortly after, you will see several buildings floating around. Look at them and hold the Triangle button down to see a memory play out. Once one memory is done, look at another building and activate the memory there.

Repeat this process until you move on to the next area. Hold down L2 and R2 when prompted. Shortly after this, you will return to Cloud's perspective. Slowly walk towards the Weapon. After another cutscene plays, Cloud and the others will be back in Gongaga village. Leave the room and approach the others. Once the next cutscene is over, you can head south to leave the village and progress the story. Alternatively, you can take some time to do some side quests.
By Flight

Once you are ready to leave, go through the gate on the south side of the village in the direction of the freeflier pilot. To get there, follow the path indicated in the image above. This will lead you to a bridge, followed by a path that you can take all the way to a mushroom that your chocobo will be able to bounce off of. When you reach the Verdant Plateau Tower, head northwest to arrive at your destination.

Upon arriving at the air strip, approach the random phone booth in the middle of the area. Interact with it to trigger a cutscene. Pay the pilot (Cid) 1,000 gil and he will agree to help the party out. After the cutscene, you will control the airplane via the motion controls of the PS5 controller. While you can move the plane, you don't have much control over where it goes. Once you land the plane, the current chapter ends and the tenth one begins.

Final Fantasy 7 Rebirth
- Platform(s)
- PlayStation 5
- Released
- February 29, 2024
- Developer(s)
- Square Enix
- Genre(s)
- RPG