


One aspect of the base game that some players wanted some elaboration on in the DLC was the Frenzied Flame and the lore behind this Madness-inducing entity. In Elden Ring, there is a Lord of Frenzied Flame ending, but little in the way of Frenzied Flame-themed bosses. Frenzied Flame aficionados got all of that, more lore, and more with the inclusion of Midra, the Lord of Frenzied Flame in Shadow of the Erdtree.

Full Hornsent Quest Walkthrough for Shadow of the Erdtree
The Hornsent is one of the first characters you meet in the Elden Ring DLC, and the Hornsent quest continues to progress until late in the game.
Midra's story is told mostly via the environment in the Abyssal Woods and Midra's Manse, and eventually, you get to fight this failed Lord of the Frenzied Flame. He might seem unintimidating at first, hobbling around on the ground in his first phase. But as players soon discover, it's important to have strategies for Midra Phase 2, when the boss transforms into a fully-fledged Lord of Frenzied Flame.
How To Get To Midra – Lord of Frenzied Flame Boss Location
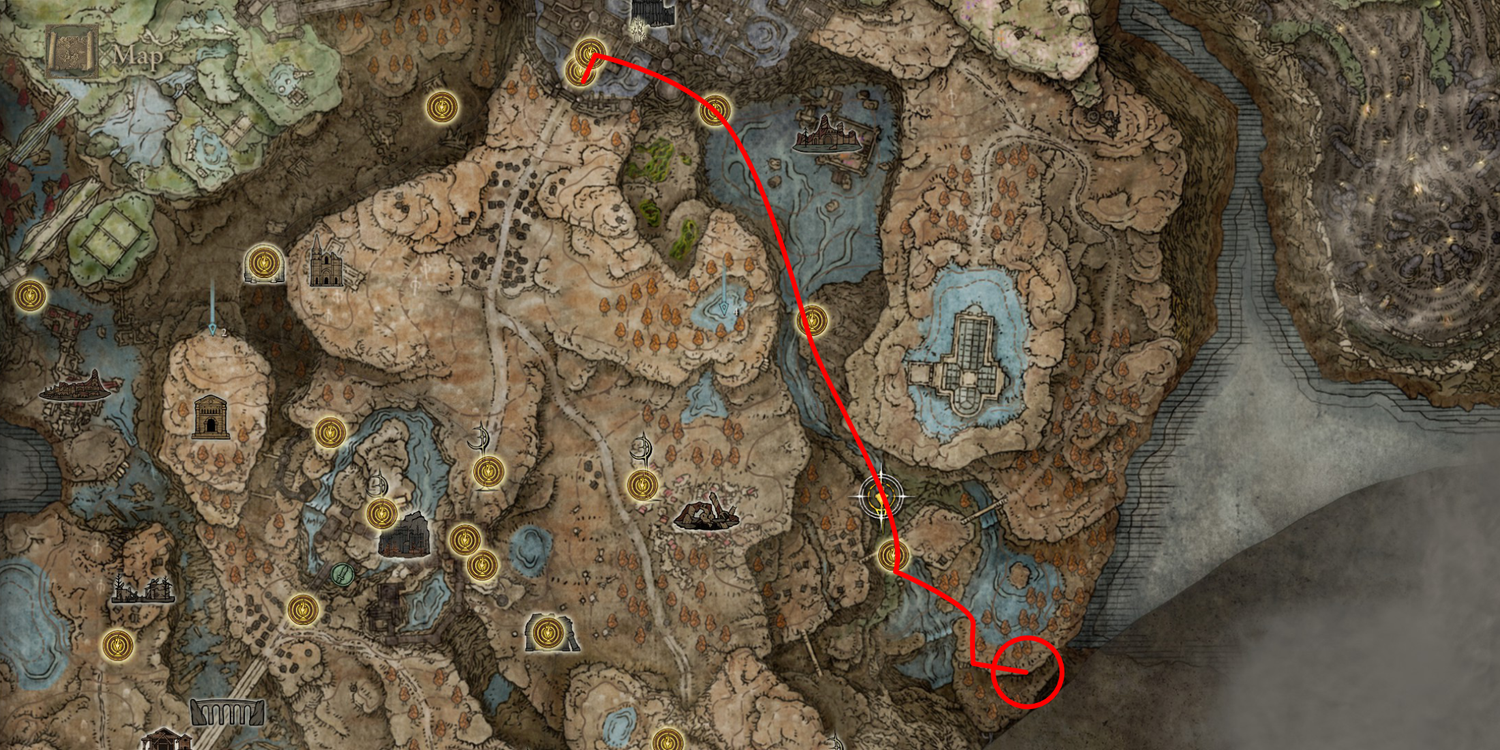
Midra is found at the end of Midra's Manse, a short Legacy Dungeon found in the south of the Abyssal Woods. You won't be able to see it on a map, as it's hidden by the bridge that leads to the Grand Altar of Dragon Communion on the map.
To get to the Abyssal Woods, head to the Main Promenade in Shadow Keep and head to the bridge with Shadow Militiamen hiding behind golden boats. You should see a ladder on the right side of this bridge after climbing the stairs up from the Main Promenade grace. Climb down this ladder to reach a room with a Painting and an illusory wall. Take the stone coffin to get to the Recluses' River Upstream site of grace, then progress south as you platform down the rocks and cliffaces. When you reach the Recluses' River Downstream site of grace, start heading east to find the Darklight Catacomb. Defeat Jori, Elder Inquisitor at the end of the Darklight Catacomb to access the Abyssal Woods.
Once here, head southward, toward the greatbridge that spans between the Dragon Pit Terminus and the Altar itself. You will not be able to ride Torrent here, and must hide from the Madness enemies that patrol various areas. If you want the Map fragment, head southeast, but if you just want to get to Midra's Manse, head south. Eventually, you should see the mansion in the distant fog.
Once inside, progress through until you reach the gigantic painting of Midra and Nanaya, which was also featured in the DLC's trailer. Roll into it to reveal a hidden path, which leads linearly toward the boss room and a site of grace.

All Major Bosses in Elden Ring: Shadow of the Erdtree
In the Elden Ring DLC, there are a total of eleven major Shadow of the Erdtree bosses, but you don't need to beat all of them to beat the DLC.
Midra Boss Fight Preparation: Gear, Talismans, & Ashes

Armor & Talismans
- Bring Armor that will grant you higher Focus, to help resist Madness. Because of the way that Midra attacks, and the wide area that many of his attacks cover, it's not a bad idea to go down to a Light Equip Load for better dodges and faster sprinting, though this can impact your ability to survive if you can't react to attacks fast enough.
- Clarifying Horn Talisman +2: Increases Focus by 180, increasing your resistance to Madness significantly
- Flamedrake Talisman +3: Found in the DLC, this greatly increases your Fire damage resistance, which is one of two damage types that Midra deals in his second (main) phase
- Two-Headed Turtle Talisman: Greatly increases your Stamina regeneration. This will make it much easier to dodge, block, and otherwise react to Midra's attacks. Almost essential for melee builds, which will spend a lot of time dodging, and will need Stamina left over (or recharged) to attack during windows of opportunity.
Spirit Ashes
- Black Knife Tiche: A classic for difficult bosses, Black Knife Tiche can uniquely cast a Weapon Art that deals a chunk of damage over time with the Black Flame. This saps percentage-based HP, and can be a boon against high-HP bosses.
- Jolan and Anna Spirit Ashes: One of the best spirit ashes in Shadow of the Erdtree, Jolan and Anna Spirit Ashes are especially great for distracting enemies and helping Bleed builds proc Blood Loss faster.
- Mimic Tear: The go-to choice for most players, it's hard to do better than a copy of yourself. Equip a heavy Poise-breaking weapon before summoning your Mimic Tear to distract and break the boss' Poise more often.

Elden Ring: Shadow of the Erdtree - Commander Gaius Boss Fight
The Commander Gaius Fight is an incredible experience, complete with horse combat and a charge attack bound to break a fair few controllers.
Midra, Lord of Frenzied Flame Boss Guide
Midra Phase One
In Phase One, Midra will attempt to hold you in a grab and inflict madness by leaping across the room. After his single line of dialogue ("...foolishness!") this tends to be the first move he tries to perform. Just dodge towards him right before he lands the leap to get out of his grab.
Aside from this move, Midra will try to swipe at you, but his attacks can be easily dodged and punished in Phase One. Midra is easily staggered with just about any weapon or spell, so wail on him until the Phase Two transition.
Midra, Lord of Frenzied Flame Phase Two: Moveset & Counters
Move | Description | Counter |
|---|---|---|
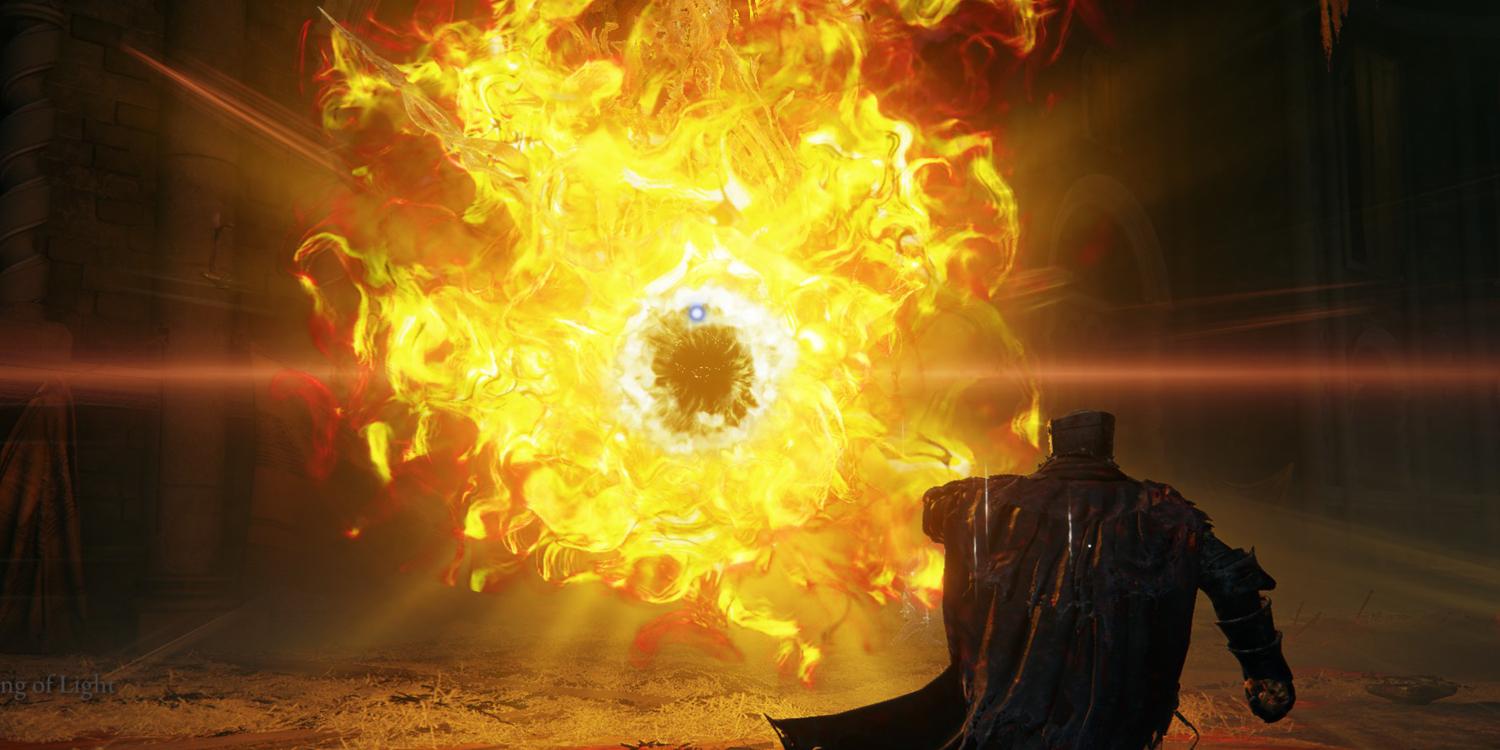
The Frenzied Flame |
| Sprint to the left or right, then dodge right before the Frenzied Flame reaches you. If you are close to the boss, dodge behind him to reliably dodge the AoE area. |
Spiralling Lunge |
| Dodge into the boss right before the attack lands. It takes about a full second for the boss to connect once it starts floating, so take care not to dodge early. |
Three-Slash Combo |
| Dodge behind the boss to avoid most of these basic attacks |
Three-Slash Combo |
| Dodge to the right first, then forward, then quickly spam your forward dodge again to avoid the Madness burst |
Dagger Swagger |
| The attack comes out fast, but dodge forward to get behind him and gain a second or two for retaliation. |
Spinning Slash |
| Sprint away if you are far from the boss, otherwise try to dodge behind the boss right before it starts spinning |
Gap-Closing Slashes |
| Usually is not performed in close proximity, and can be easily sprinted away from – or even parried |
Frenzied Slash |
| Dodge behind the boss at the last second to avoid both the hit and follow-up Madness explosion |
That One Floating Explosive Head Move |
| Sprint away from the boss as soon as you see him rise into the air. If you don't have time to get away, dodge into the boss at the very last possible moment, and hope you don't land in a patch of Frenzy. |
That One Standing Explosive Head Move |
| Dodge behind the boss as soon as you see him lean forward and start to enlarge his head. The explosion will damage you if you do not dodge again, even if you are behind him. |
Frenzied Leaping Grab |
| Midra will hang in the air for about a full second before coming to land, so be sure to dodge this in any direction with the proper timing. |

All New DLC Weapons in Shadow of the Erdtree
There are more than a hundred Shadow of the Erdtree new weapons, many of which belong to one of eight completely new weapon types.
General Strategies: Midra Weaknesses & Openings
When it comes to how to beat Midra in Shadow of the Erdtree, strategies mostly come down to taking advantage of Midra's weaknesses and taking time to find openings in his elaborate attack patterns. Having a Light Equip load can help find these openings as you will dodge further and move faster.
Midra is particularly resistant to Fire damage and it's not worth using any Fire spells when taking on this boss because of it. However, Incantation-users rejoice: Holy spells seem to work pretty well against Midra, so consider swapping your Fire Giant Incantations for Miquella's or Fundamentalist Incantations instead.
The Lord of Frenzied Flame weaknesses also include Bleed damage and breaking his Poise.
- Though many enemies in the DLC can be inflicted with Blood Loss, Midra appears to take more Bleed build-up than other bosses – perhaps owing to this character's tragic backstory with the Inquisitors.
- Additionally, Midra is a small-medium size boss, and you can break his Poise regularly by using windows of opportunity to Jump or Charge Attack with heavy weapons. This is crucial in the second part of Phase 2, when the boss gains a variety of explosive spells that can be interrupted with a well-timed Stance Break.
There are a few attacks when the Midra boss fight presents openings for players to retaliate back. In fact, after completing almost any of its combos (which never exceed three attacks in a row), you almost always get a full one-to-two seconds to attack back. This boss' attacks are incredibly well telegraphed, which makes them easy to anticipate.
As long as you can dodge behind the boss during any of his extended combos, you can find plenty of attack windows. And as long as you get away from his Explosive attacks, you will come through the other side in good shape.
Midra, Lord of Frenzied Flame Boss Rewards
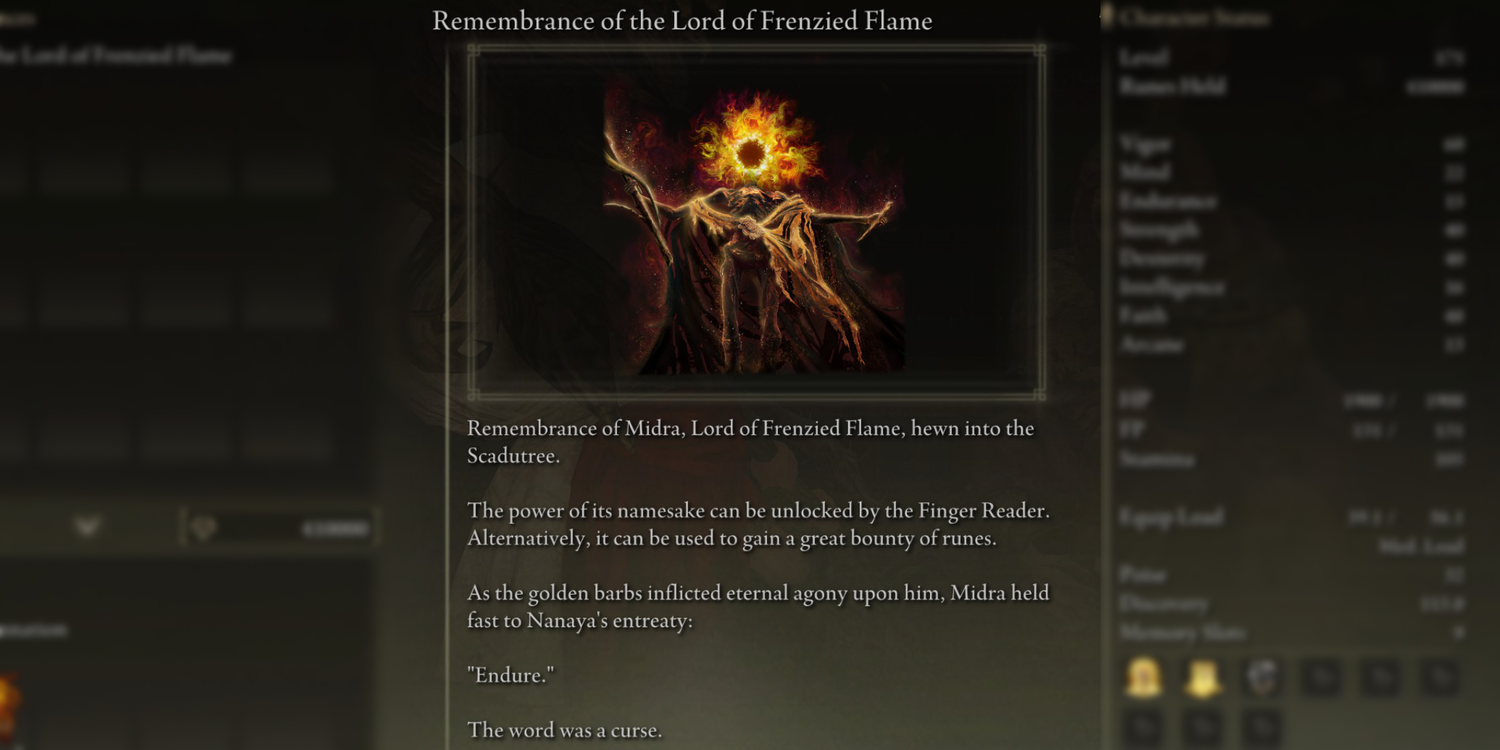
For beating Midra, Lord of Frenzied Flame, Shadow of the Erdtree players will receive the Remembrance of the Lord of Frenzied Flame. This Remembrance can be turned into Enia for a choice between two Midra boss rewards, as with all Remembrances in Elden Ring.
- Greatsword of Damnation: A Strength/Faith weapon primarily, the Greatsword of Damnation scales well and deals a ton of damage with its Ash of War, Golden Crux – especially in PvP, where the attack can be difficult to avoid.
- Midra's Flame of Frenzy: An Incantation requiring 41 Faith, this spell sees the player rise up and summon the Lord of Frenzied Flame's head to create an immense amount of Frenzied Flame damage in the immediate area, just like in the boss fight.
Of the two, the Greatsword is arguably the better choice, as Madness does not affect every enemy type and the Incantation requirements are relatively high. The Greatsword, on the other hand, deals flat Physical and Holy damage and has low Stat requirements. It is not advised to consume the Remembrance for Runes, as both of these items are much more useful. But if you really want to use the Remembrance for Runes, you can get 30,000 out of it – a fraction of a level by the time you reach the DLC.

Elden Ring: Shadow of the Erdtree
- Base Game
- Elden Ring
- Platform
- Xbox Series S, Xbox Series X, PS5, PS4, PC, Xbox One
- Released
- June 21, 2024
- Developer(s)
- FromSoftware
- Publisher(s)
- Bandai Namco Entertainment , FromSoftware
- Genre
- Soulslike , RPG
- ESRB
- M For Mature 17+ Due To Blood and Gore, Language, Suggestive Themes, Violence