


The newest Destiny 2 dungeon features the dangers of the deep methane sea of Titan, as well as the horrors of the Lucent Hive. Destiny 2 will challenge players with Ghosts of the Deep, especially those that venture into the dark alone, and without a fireteam of three Guardians to help revive them when they are overrun by the countless Acolytes and other dangers.
For some players, it’s an achievement in itself to solo Ghosts of the Deep. Even more so, it’s a celebration of skill and determination to solo flawless Ghosts of the Deep, a dungeon that will challenge the individual player through hardship and excitement, with unique rewards facing those that want to solo flawless this Destiny 2 dungeon.
Alone In The Deep

If players complete all encounters in the Ghosts of the Deep dungeon solo and without leaving the activity, they will be rewarded with the Alone in the Deep triumph. This triumph is essential to claiming the Ghoul title, and it will also provide players with an increased chance at the drop rate for the Exotic Trace Rifle exclusive to this dungeon, The Navigator, proving one of the best Trace Rifles in Destiny 2.
It is vitally important that players do not leave the dungeon once they have started it. Even if they have a checkpoint, it will cancel the Alone in the Deep triumph. Players do not need to flawless the dungeon, only complete the entire thing solo. However, for a better chance to flawless solo the Destiny 2 dungeon, there’s a certain build that may help.
Solar Titan Build

The best class in Destiny 2 for survivability is the Titan class. Solar Titans are known for their outstanding survivability that no other class or subclass has. Solar Titans are by far the most efficient at solo flawless dungeons, lost sectors, and especially Season 21’s Ghosts of the Deep Dungeon. Players are going to want to equip Healing Grenades, with the right Aspects and Fragments for this Solar Titan build that will ensure their survival and success in Ghosts of the Deep.
The Best Fragments
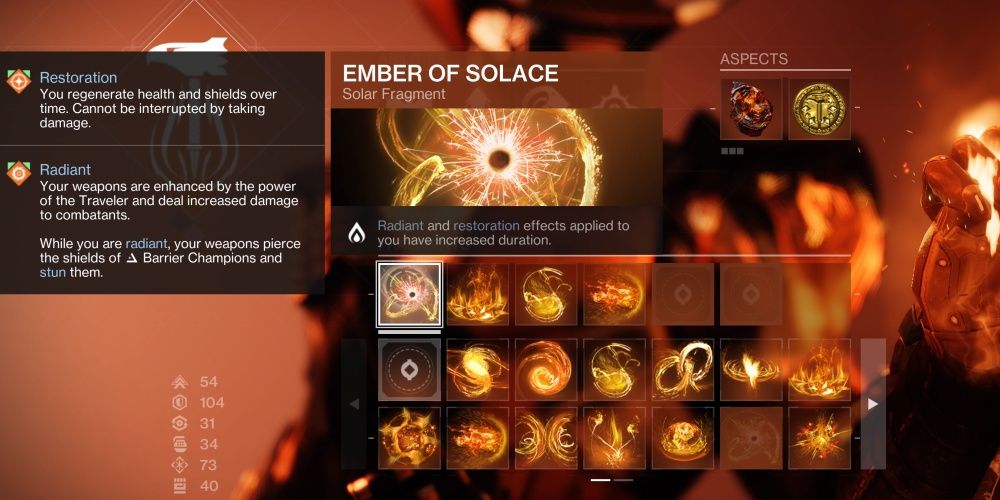 Ember of Solace
This Fragment increases the Radiant and Restoration duration effects applied to the player. This is essential, as Restoration will allow players to regenerate health and shields, which will not be interrupted by taking damage. Radiant will also enhance the weapon damage players deal to combatants.
Ember Of Empyrean
Although players may receive a -10 to their Resilience with Ember of Empyrean, the true benefit of this Solar Fragment is due to the extended duration of Restoration and Radiant effects that players will receive when they receive final blows with their Solar weapons or abilities.
Ember Of Singeing
With Ember of Singeing, players will receive a faster class ability recharge when they Scorch targets. Scorching targets singe them by Solar Light, causing damage over time. This is possible through the use of the Throwing Hammer, meaning players will regenerate class ability through repeated Scorch and Ignition stacks.
Ember Of Torches
Powered melee attacks against combatants will make players and fellow Guardians Radiant. Even with a -10 Discipline, Ember of Torches is essential to this Titan build, as a large factor of the survivability comes from repeated throws and kills with the Throwing Hammer, which will constantly heal the Guardian.
Best Aspects
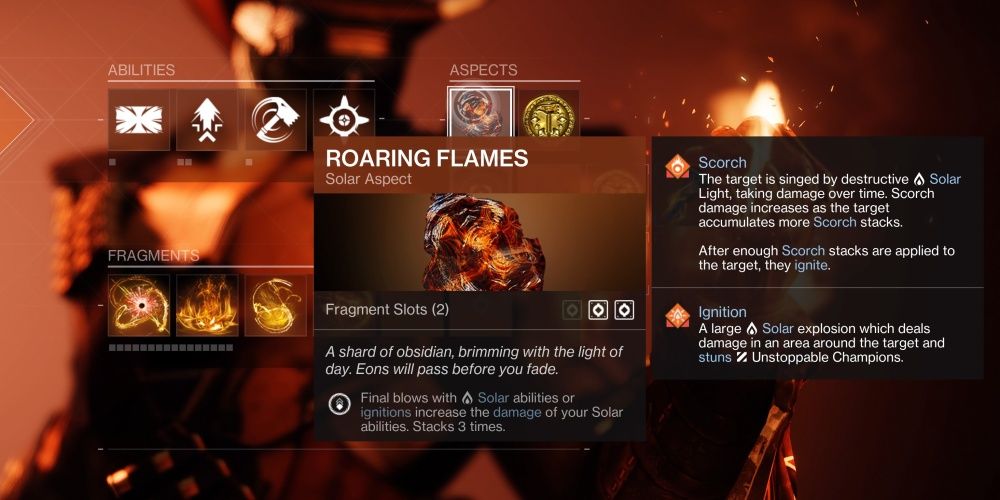 Roaring Flames
Pairing perfectly with Throwing Hammers, Roaring Flames will allow final blows with Solar abilities or ignitions to increase the damage of all Solar abilities for up to 3 Stacks. This Aspect will also let players equip 2 Fragments, and the extra Solar damage is essential to the Throwing Hammers.
Sol Invictus
Solar ability final blows will create Sunspots, meaning Hammer of Sol impacts and Throwing Hammer eliminations will unleash a fury of Sunspots on the battlefield. These Sunspots apply Restoration, faster ability regeneration, as well as Scorch and damage to targets inside them. This Aspect will also provide 2 Fragment slots.
Armor, Mods, And Weapons

Players must bring the Synthoceps Exotic Arms. These Titan gauntlets have the Exotic Perk of Biotic Enhancements. This means that players will have increased melee lunge range, as well as improved melee damage when surrounded, a vital perk for this build. For the Arms Armor Mods, players are going to want Heavy Handed, which generates Orbs of Power upon powered melee final blows, which is something players will be doing, a lot. They will also want Impact Induction, which reduces grenade cool-down with melee attacks, meaning a constant stream of Healing Grenades. The third Arms Mod is the Solar Loader, which increases the reload speed of Solar weapons.
The most essential Stats that players can have for their armor is 100 Resilience. With 100 Resilience, players will gain 40% damage reduction. To further extend this damage reduction, players will want to equip Void Resistance, Arc Resistance, and Concussive Dampener for the Chest Armor Mods. These will counter the effects of the Lucent Hive, as they will fire area-of-effect attacks, Void attacks, and Arc attacks.
The Helmet Armor Mods players need for this build is 2 Solar Siphons, a Mod that will generate Orbs of Power upon solar weapon final blows. Heavy Ammo Finder will also increase the drop chance of Heavy Ammo, especially with primary ammo final blows.
For the Leg Armor Mods, players will need Solar Weapon Surge to increase the damage of their Solar abilities and weapons. Solar Scavenger, to provide their Solar weapons with bonus reserves when picking up ammo used by that weapon, and Recuperation, which will replenish health each time players pick up an Orb of Power.
When it comes to the Class Item Armor Mods, players will want to equip 2 Time Dilation mods. This ensures that players will have a longer duration for their decaying Armor Charge, leaving them with more time between Orbs of Power pick-ups to extend their damage duration.

As for weapons, a Scout Rifle and a Solar SMG are recommended. Players will rarely be using their guns due to the power of the Throwing Hammer, but a Solar SMG is a great choice considering the speed it shoots out, as well as the ability to remove Lucent Hive Solar shields. A Scout Rifle is also a great choice due to the range players will have with difficult enemies.
Players will want to bring two Exotics Power Weapons to Ghosts of the Deep, starting with the Xenophage due to the kicking power of this Solar Machine Gun. The Tractor Cannon will be the second Exotic Power Weapon players need for later in the dungeon.
Break The Ritual, First Encounter

When entering the Ghosts of the Deep dungeon, players will immediately begin the first encounter to Break the Ritual by attacking the Hive Knights at the Ritual site. To Solo Flawless this dungeon, it’s best to keep at a distance, either using Scout Rifles or Throwing Hammers to remain in a constant stream of Radiant and Restoration effects.
When it comes to killing the Ogres, Wizards, and Lucent Hive Light Bearers, the Xenophage will be the player’s best play. This weapon will one-shot the Wizards, and stun the Hive Light Bearers and Ogres. The Titan Super should be reserved for when the player is in trouble, as this will treat them as a hammer-throwing tank. Repeat the Ritual step four times to complete the first encounter.
Underwater Journey

After the first encounter with Ghosts of the Deep, players have quite the journey ahead of them. Players need to make the descent down into the deep. Players mustn't die during this segment, as not only will it start them from the beginning of the jumping puzzle, but it will wipe their chances of getting a flawless run, and evoke the smugness of Xivu Arath.
Players will want to prioritize the air bubbles underwater to regenerate the pressure that they have. The journey isn’t too long, but being crushed under the methane pressure is a risk, as well as the bounds of Hive that are in the way until players reach the second encounter.
Ecthar, The Shield of Savathun, Second Encounter

Ecthar will be the riskiest encounter of the three, as players won’t be relying on their guns, just their Throwing Hammers and the Tractor Cannon. When players begin the encounter, they are going to throw their hammers to generate Sunspots and Restoration effects, all whilst filling the battlefield with Orbs of Power for later use.
It’s best to memorize the Hive symbols needed to enter Ecthar’s damage phase, whilst keeping ready with those Throwing Hammers against the Wizard Light Bearers. Now in the damage phase, players will want to use their Hammers of Sol Super to remove Ecthar’s shield and generate Sunspots near the boss, thus making easy work of Savathun's warrior.
The tricky part comes in when players run out of their Super. They are going to want to approach Ecthar, shooting him with the Tractor Cannon Exotic Power Weapon to use Void Suppression and obtain bonus damage. Then, they are going to want to spam their Throwing Hammer, causing around 100,000 damage per throw. This should take 4 to 5 phases, and if players are losing health faster than they can gain it, then throwing a Healing Grenade is a great benefit.
Simmumah Ur-Nokru, Lucent Necromancer, Third Encounter

After the death of Ecthar, players will want to change their loadout somewhat. Players will need the Xenophage back on, as well as an alteration to their Leg Armor Mods. Players will now want 3 Solar Weapon Surges, to truly maximize the damage of the Xenophage, as this weapon will be the cannon that kills Simmumah Ur-Nokru, provided that players have the Heavy Ammo needed for the damage phases.
Simmumah Ur-Nokru will consume most of the player's time, as this is a boss with well over 9 million HP. This encounter is vastly dangerous due to the swarming Acolytes and Knights, as well as Simmumah’s ability to shoot arc moths that will instantly kill the player if more than one hits. Players should immediately kill the Hive Knights, as they do not respawn until the next damage phase, whilst keeping an eye out for Simmumah to ensure they shoot the arc moths they summon.
Players will need anywhere between 5 and 7 damage phases to defeat this boss in the room of Oryx's corpse. The best way to engage in Simmumah’s damage phase is to gather enough Orbs of Power to keep Armor Charges and then unload the Hammers of Sol Super to remove the wizard boss’ shield. Then, players will want to hit consistent shots with the Xenophage until the damage phase is over. Repeating this process may be lengthy, but it is extremely efficient in yielding success.
Destiny 2 is available on PC, PlayStation 4, Xbox One, PlayStation 5, and Xbox Series X/S.